Setting up Prince of Persia
First steps
We will set up the demo version of Prince of Persia, the classic cinematic platformer from 1990, as our first example. It was a landmark game, and it can still provide countless hours of entertainment if you like platformers that require you to exercise that pesky grey matter a bit.
First of all, we’ll create a new folder to store all our DOS games. We’ll
use DOS Games throughout this guide, but you can pick any name you like.
It’s best to create this folder in your regular documents folder so DOSBox
Staging has full read and write access to it (don’t put it in a system folder,
e.g., Program Files on Windows). Each game will have its own dedicated
subfolder under DOS Games, so let’s create our first one called Prince of
Persia.
Now download pop1.zip from the Prince of Persia demo page
and extract its contents into DOS Games/Prince of Persia. The archive
contains only two files: pop1.txt (a regular text file) and pop1demo.exe
(an MS-DOS executable). Let’s open pop1.txt in our text editor!
It's like an Arabian Nights movie come to life... with you as the star!
Leap into an exotic labyrinth of heart-stopping action, challenging mazes,
intrigue and superb animation that's breathtakingly realistic!
This is a demonstration version which only has limited functionality. To
obtain the full program, just access GO BB, and order it from our store.
I’m not quite sold on the “heart-stopping” part, but otherwise, it sounds intriguing! As indicated by the second paragraph, this is a fully playable demo version that includes only the first two levels of the game. That’s more than enough for our purposes here; you can always get the full game later.
But there are no further instructions, so what should we do next? Well, setting up old DOS games is not all that dissimilar to solving adventure game puzzles. Getting past these puzzles requires some logical thinking, a little bit of background knowledge, and the occasional bit of trial and error. Of course, the user manual often helps, too, if you happen to own the original or can procure a scanned copy online (most often you can).
Luckily, this is an easy one: executable files (programs or scripts you can
start) under MS-DOS have the .EXE, .COM, or .BAT file extension. Looking
at pop1demo.exe, the solution is quite obvious: we’ll need to run this
executable file in DOSBox!
The C drive
Most DOS games need a hard drive as a hard requirement (okay, I’ll show myself to the door…), but by default, DOSBox Staging doesn’t have access to your computer’s hard drive where your programs and documents reside — we need to tell it which folder to use as its “virtual DOS hard drive”. This is called mounting; we mount a folder as the “DOS hard drive”, the contents of which are then available to DOSBox as the C drive. All drives in DOS are assigned letters from the English alphabet (just like in Windows), and the C drive is usually your first hard drive.
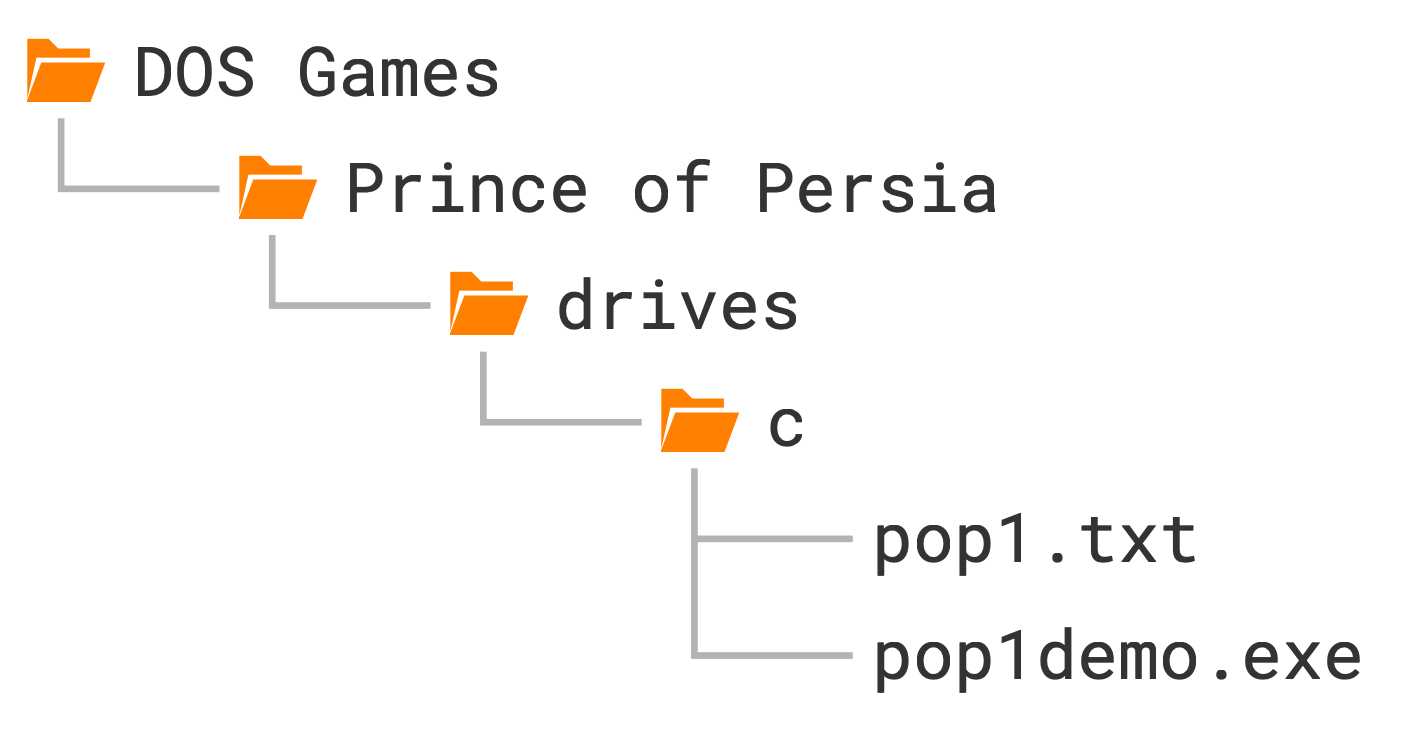
The recommended way to mount the C drive is to create a drives subfolder
inside your game folder. This drives folder is a “magic” folder with a
special purpose: all its subfolders with single-letter names are automatically
mounted as DOS drives with the same letter. This mechanism to auto-mount
subfolders like drives/c and drives/d as DOS drives is called
automounting and is unique to
DOSBox Staging.
In our case, we only need a single C drive, so we’ll create a c subfolder
inside our drives folder (technically, it does not make a difference whether
you use uppercase or lowercase “letter C” on Windows and macOS, but it does in
Linux, so we recommend always using lowercase). We’ll then copy the files from
the pop1.zip archive into drives/c to end up with the following folder
structure:
Origins of the C drive
Have you ever wondered where the name “C drive” on Windows comes from? This is something Windows inherited from its MS-DOS heritage (which in turn inherited it from CP/M). In DOS, all drives are assigned letters from A to Z. Most computers of the era had two floppy drives, so letters A and B were reserved for them or other removable media, and the first hard drive partition was usually assigned the letter C. We no longer have floppy drives in our computers as standard equipment, but this tradition stuck around for backwards compatibility.
You can learn more about MS-DOS-era storage options and MS-DOS drives in the Storage section of the user manual.
Attention, Windows users!
If you’re a Windows user, do not confuse your real C drive, where your operating system and programs are stored, with the “virtual DOS C drive” emulated inside DOSBox. You’ll want to understand the distinction between the two as they are completely separate concepts — DOSBox will not see the contents of your real Windows C drive by default (or the contents of any of your other drives, for that matter).
Starting DOSBox Staging
Okay, with our C drive set up and ready to go, the next step is to start
DOSBox Staging from our DOS Games/Prince of Persia folder. This is
accomplished slightly differently on each platform.
Windows
First things first
After installing DOSBox Staging, we strongly recommended starting it once using the Start Menu shortcut or the desktop icon as described here. Otherwise, the instructions below might not work.
If you have used the installer with the default options to set up DOSBox
Staging (and we recommended doing so while you’re still learning the ropes),
simply right-click on the Prince of Persia folder in Windows Explorer and
select Open with DOSBox Staging in the context menu.
Alternatively, navigate to the folder in Windows Explorer, right-click anywhere on the blank area inside it, and then select Open with DOSBox Staging in the context menu.
macOS
Method 1 — document packages
The simplest way on macOS is to use DOSBox Staging document packages. Simply add the .dosbox extension to the game folder’s name in Finder (so Prince of Persia becomes Prince of Persia.dosbox), then double-click it to launch DOSBox Staging.
Method 2 — launch icons
We instructed you not to delete the DMG disk image just yet, remember? If you missed that, please download it again, then do the following:
-
Mount the DOSBox Staging installer
.dmgimage file. -
Copy the Start DOSBox Staging icon from the window that appears into the
Prince of Persiafolder. -
Right-click or Ctrl-click the icon, then select the topmost Open menu item.
-
A dialog with the following text will appear: macOS cannot verify the developer of “Start DOSBox Staging”. Are you sure you want to open it?
-
Press the Open button.
-
A dialog will open, asking for permission to allow DOSBox Staging access to your Documents folder. Click the OK button.
You only need to perform this procedure the first time you open the Start DOSBox Staging. After the first launch, you can use it like any other regular icon.
Tip
You don’t need to repeat this procedure for every new game. Once you’ve
opened an icon once, just copy that same icon into any future game folder
— no need to fetch a fresh one from the .dmg each time.
Linux
Open your favourite terminal and cd into the Prince of Persia directory,
then run the dosbox command from there.
Use the --version argument to check that you’re running DOSBox Staging and
not some other DOSBox variant:
% dosbox --version
dosbox-staging, version 0.83.0

Copyright (C) 2020-2026  The DOSBox Staging Team
License: GNU GPL-2.0-or-later <https://www.gnu.org/licenses/gpl-2.0.html>
Alternatively, create a shell script or a shortcut on your desktop that executes the following command:
dosbox --working-dir <PATH>
<PATH> is the absolute path of your game directory (Prince of Persia, in
this case).
Installing the game
You’ll be greeted by the following window when starting DOSBox Staging:
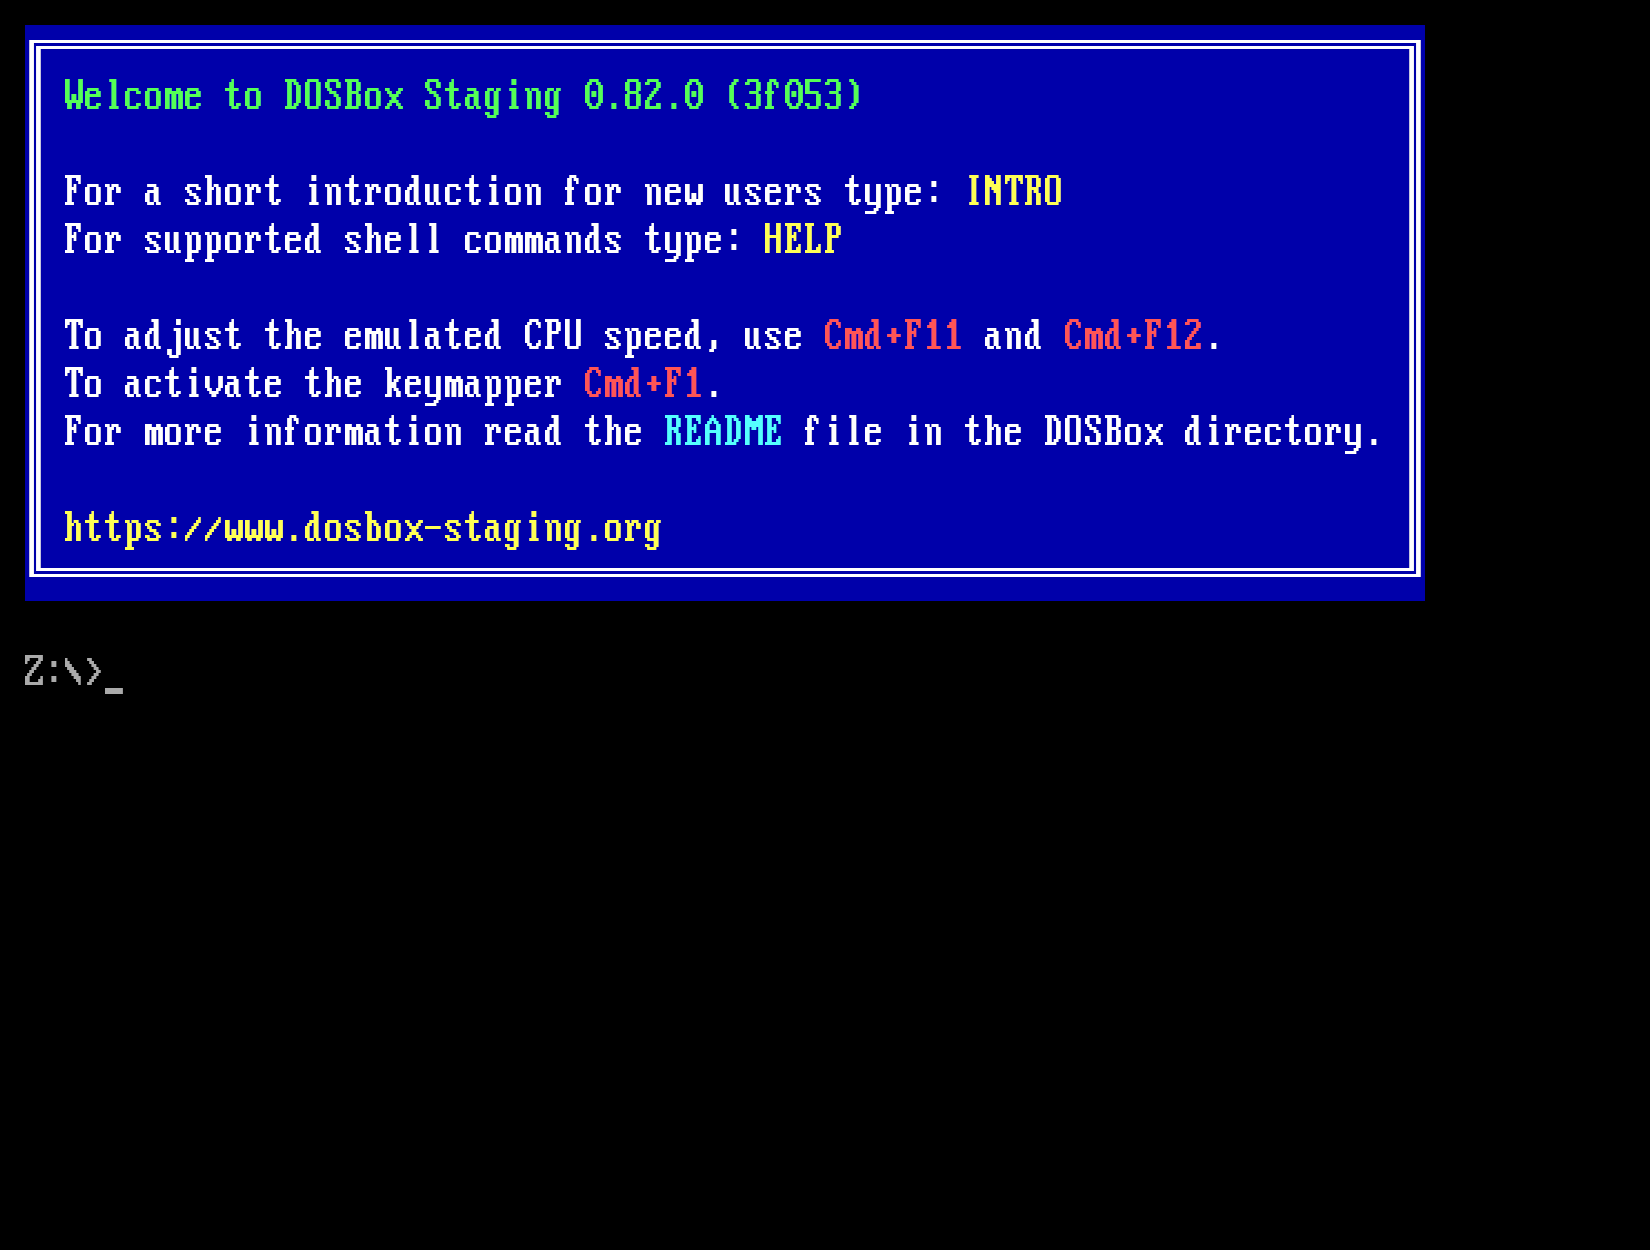
Let’s ignore the polite welcome message for now and focus on the text below the big blue rectangle:
The first line is pretty straightforward — it tells us that DOSBox Staging
mounted drives/c we created earlier as the “C drive”. In MS-DOS, folders are
called directories — the various DOSBox messages usually use the word
“directory”, and we’ll use the two terms interchangeably in this guide.
The second line is the DOS prompt. DOS has a command line interface that predates graphical user interfaces we’re accustomed to from modern operating systems. We get DOS to do things by typing in commands, and if we manage to do this correctly, DOS will follow our instructions to the letter (pun intended). DOS is not a multitasking operating system; you can only do a single thing in it at any given point in time.
Let’s analyse the prompt a little bit: it always starts with a letter followed by a colon, which denotes the current drive. Right after startup, this is always the Z drive. This is a special drive that’s always available; DOSBox stores some of its commands on it — you don’t need to worry about it for now.
After the colon is the path of the current folder or current directory in
DOS terminology; this is currently the root directory (topmost directory)
of the Z drive as indicated by the \ (backslash) character. The >
character just signifies the end of the prompt, and the blinking underscore
(_) character after it is — guess what? — the cursor.
Okay, enough theory! Type in C:, and then press Enter to switch
to the C drive. The prompt should now reflect that we’re in the root directory
of the C drive:
Type in dir and press Enter to list the contents of the current
directory:
C:\>dir
 Volume in drive C is CDRIVE
 Directory of C:\

POP1     TXT                     362 07/07/1995 10:12a
POP1DEMO EXE                 267,420 07/05/1995  9:53a
                2 file(s)               268,116 bytes
                0 dir(s)            262,144,000 bytes free
C:\>_
Well, that’s what we put into our virtual C drive, so nothing too spectacular
so far. We’ll execute pop1demo.exe next! Type in pop and press the Tab
key once to instruct DOSBox to complete the filename for you. This handy
feature is called tab completion, and it saves you from a lot of typing.
Press Tab a few more times and observe how it alternates between
POP1.TXT and POP1DEMO.EXE — this makes sense as these are the only two
files in the current directory that start with pop.
DOS filenames
DOS filenames are always uppercase and are limited to 8 characters, plus an optional 3-character file extension. It does not matter whether you type in lowercase or uppercase letters because DOS will always convert them to uppercase before processing your commands. Tab completion always uses uppercase because… well, I guess it just looks nicer!
Okay, let’s make sure POP1DEMO.EXE is displayed in the prompt, then press
Enter to run this executable file. It turns out this is a
self-extracting archive that unpacks its contents into the current directory
when you run it. The following will appear (I’ve redacted the list of
extracted files):
C:\>POP1DEMO.EXE

PKSFX (R)   FAST!   Self Extract Utility   Version 2.04g  02-01-93
Copr. 1989-1993 PKWARE Inc. All Rights Reserved. Shareware version
PKSFX Reg. U.S. Pat. and Tm. Off.

Searching EXE: C:/POP1DEMO.EXE
  Inflating: CDUNGEON.DAT
  Inflating: DIGISND1.DAT

  ...

  Inflating: PRINCE.EXE

C:\>_
The more observant among you might have noticed the last entry, PRINCE.EXE.
Bingo, that’s our game executable! But let’s pretend we haven’t spotted it;
how do we find all executables in the current directory? By issuing the dir
command with the *.exe wildcard search pattern!
But instead of typing in dir *.exe, press Up a few times until dir
appears in the command line, then type in the rest (Space character
followed by *.exe). This handy feature is called command history — you
can move forward and backward in the list of previously executed commands with
the Down and Up keys, respectively. Best of all, the command history
is preserved across DOSBox Staging restarts.
Okay, so here’s what the output looks like:
C:\>dir *.exe
 Volume in drive C is CDRIVE
 Directory of C:\

POP1DEMO EXE                 267,420 07/05/1995  9:53a
PRINCE   EXE                 123,335 03/29/1990  0:00a
                2 file(s)               390,755 bytes
                0 dir(s)            262,144,000 bytes free
C:\>_
Tip
Alternatively, you can use the ls command, which displays the directory
contents in a wide list format. This command highlights executable files
in green (.EXE, .COM, and .BAT file extensions) and directories
(folders) in blue.
Another way is to use the special dir.exe syntax — this will list all
files with the .exe extension. You can use this form with other
extensions too, of course.
FAT filesystem
MS-DOS uses the FAT filesystem (nothing to do with body weight) that
allows up to 8-character filenames, followed optionally by a file
extension consisting of a dot and at most three further characters.
Filenames can only contain uppercase letters, digits, and certain special
characters, such as the dash (-), underscore (_), and the exclamation
mark (!).
The two files we originally copied to our drives/c folder had all
lowercase filenames (pop1.txt and pop1demo.exe). This does not matter
as DOSBox automatically converts all filenames in our drives/c folder to
uppercase behind the scenes.
Want to learn more about DOS?
The DOS primer in the manual covers the basics of the DOS environment, and the Commands page documents all available built-in commands.
Starting the game
There’s nothing else left to do than to start PRINCE.EXE (type in the letter
p, press Tab to auto-complete it to PRINCE.EXE, then press Enter).
After a short loading, the title screen will appear and you’ll hear the
classic Prince of Persia intro music playing! Don’t press any key yet, just
wait and watch the intro sequence until the end to learn about the game’s
backstory.
Running DOS programs
To run executable files (files with the .EXE, .COM or .BAT file
extension), it’s enough to type in the filename only without the
extension. So you could have started the game with the prince command as
well.

Prince of Persia — Title screen
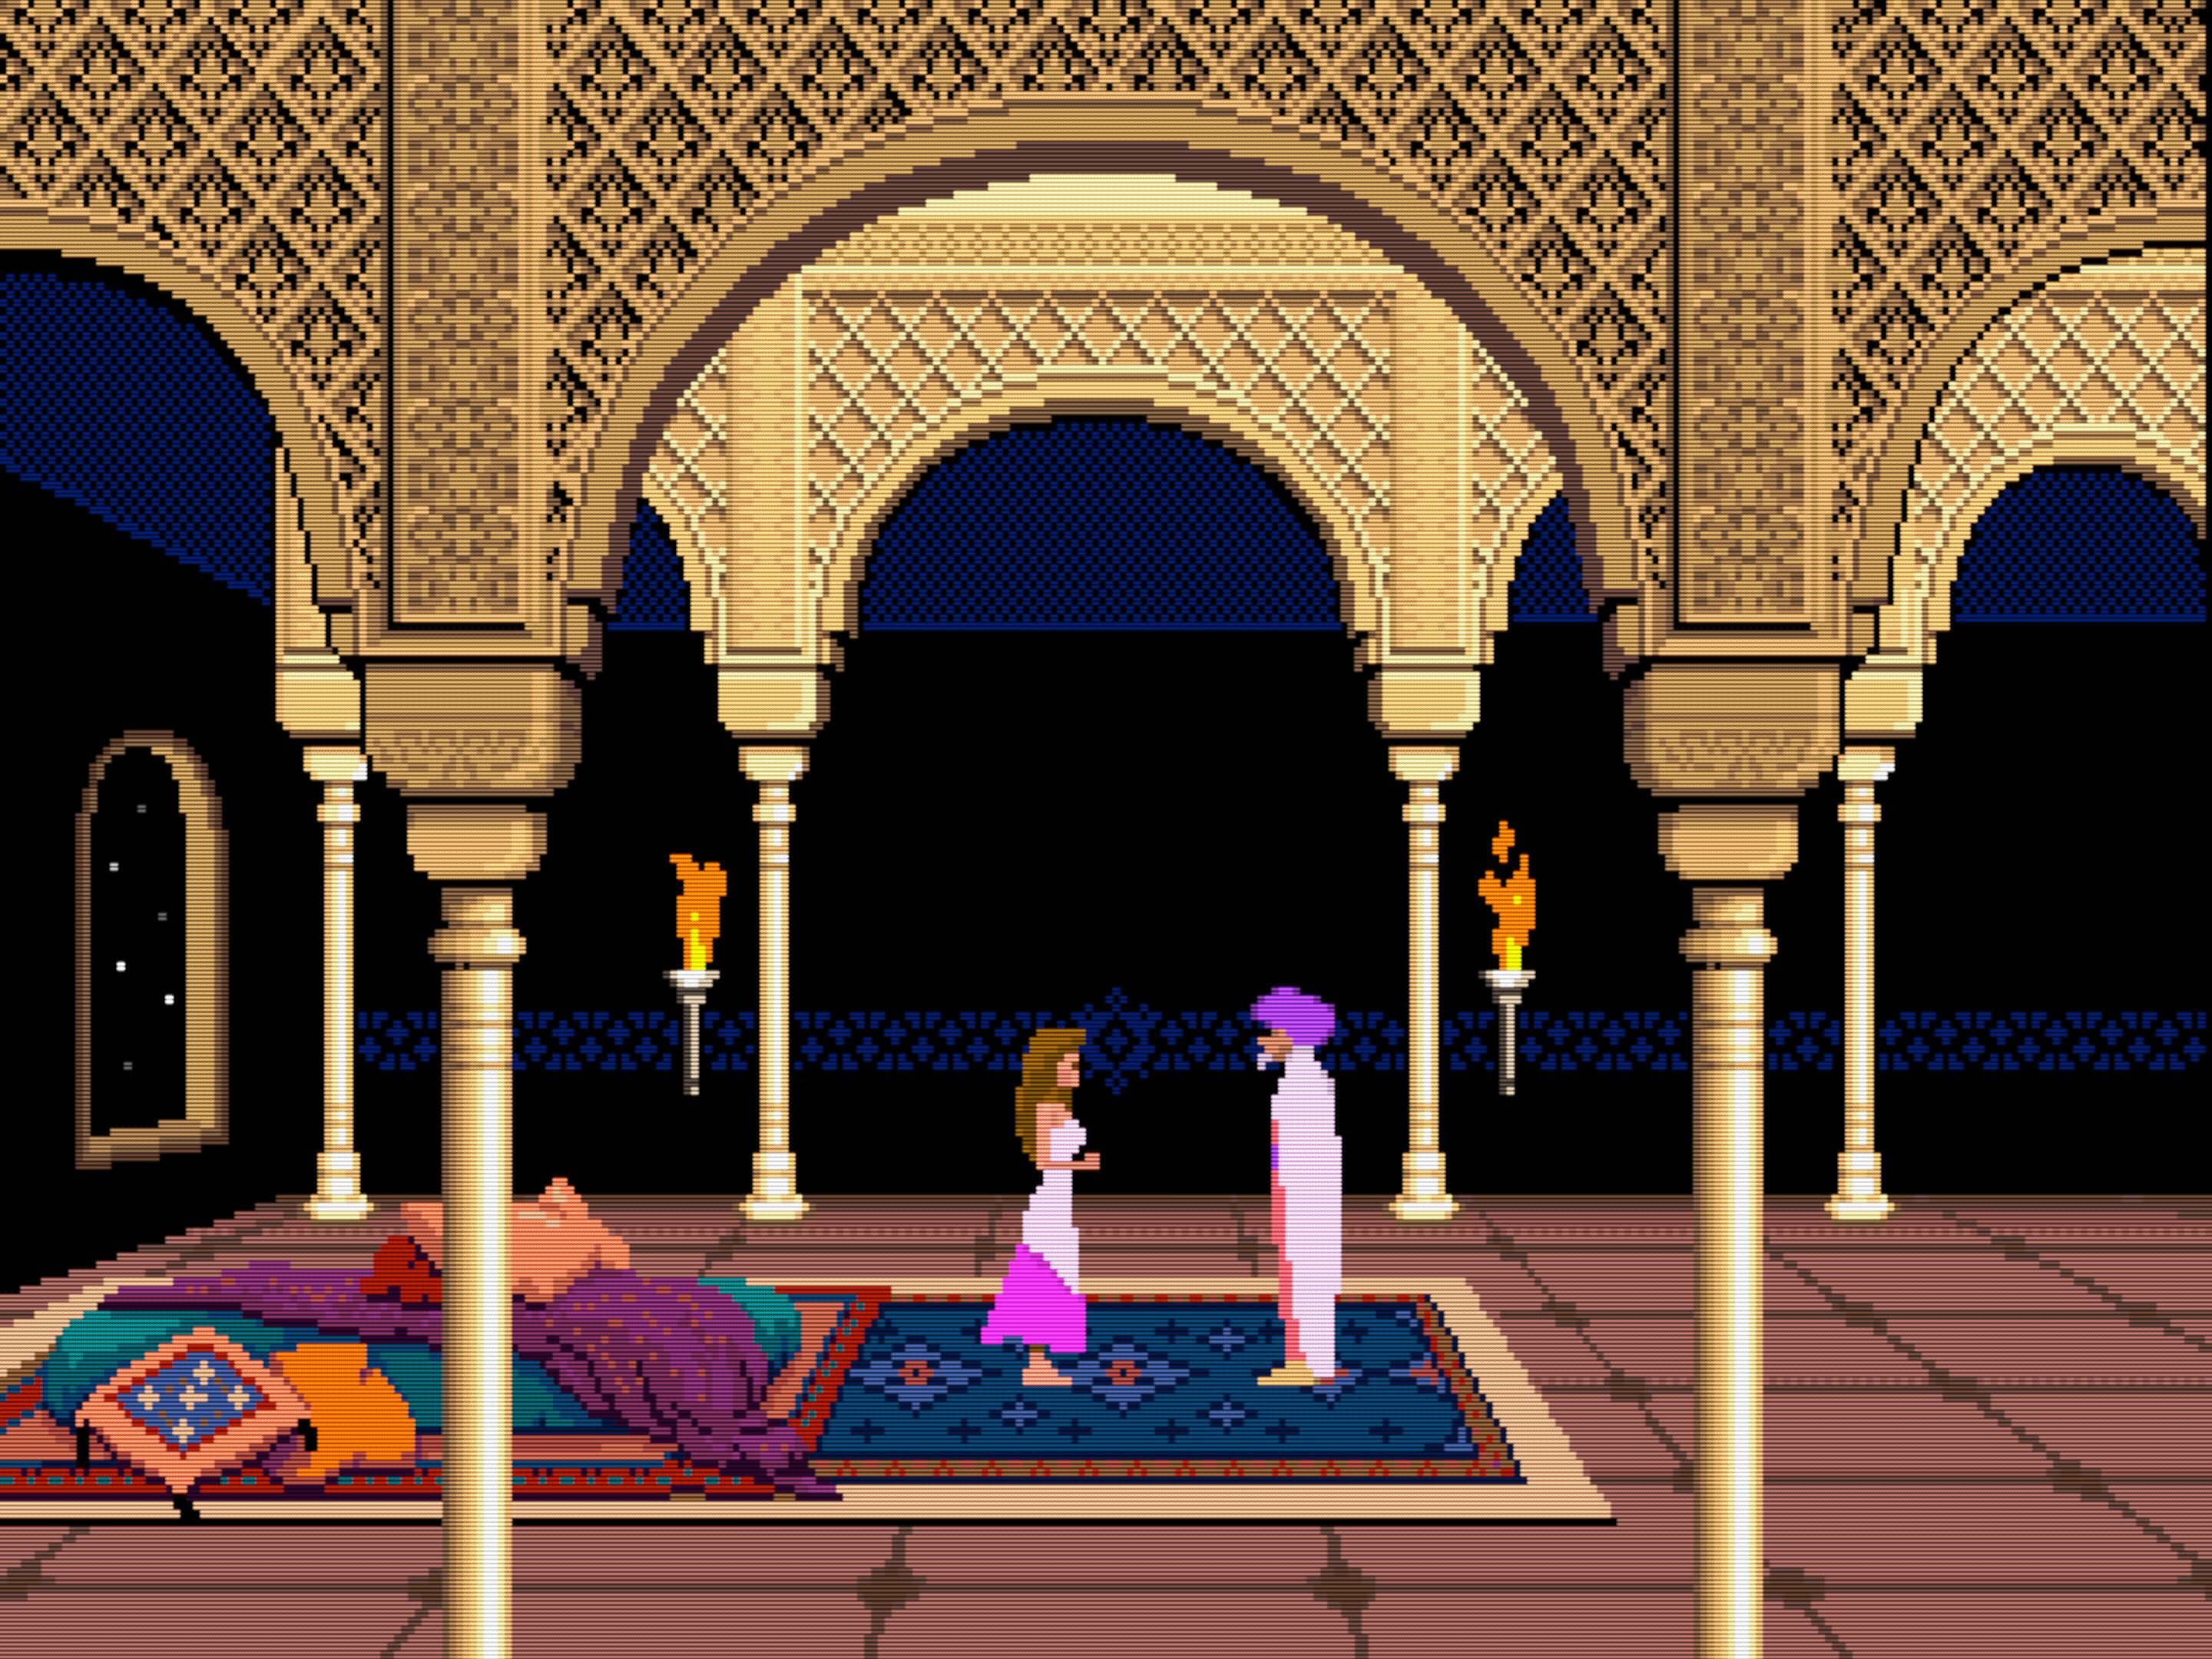
Prince of Persia — Scene from the intro sequence
If you keep watching, the game will enter demo mode, where the protagonist will soon meet his untimely death… Surely, we can do better than that! Press any key to start the game!
This particular game supports both the keyboard and the joystick. DOSBox Staging emulates a joystick by default, even if you don’t have a physical game controller plugged in. The game is clever enough to auto-detect that and switch to joystick mode at the start. Okay, so let’s switch to keyboard mode instead by pressing Ctrl+K!
You can control the prince with the cursor keys. Hold down the Shift key to walk carefully. It’s not that hard to figure out the various movement combinations on your own, but reading the Controlling Your Movements section of the user manual should definitely help. The manual also contains helpful hints and a full list of available keyboard shortcuts.
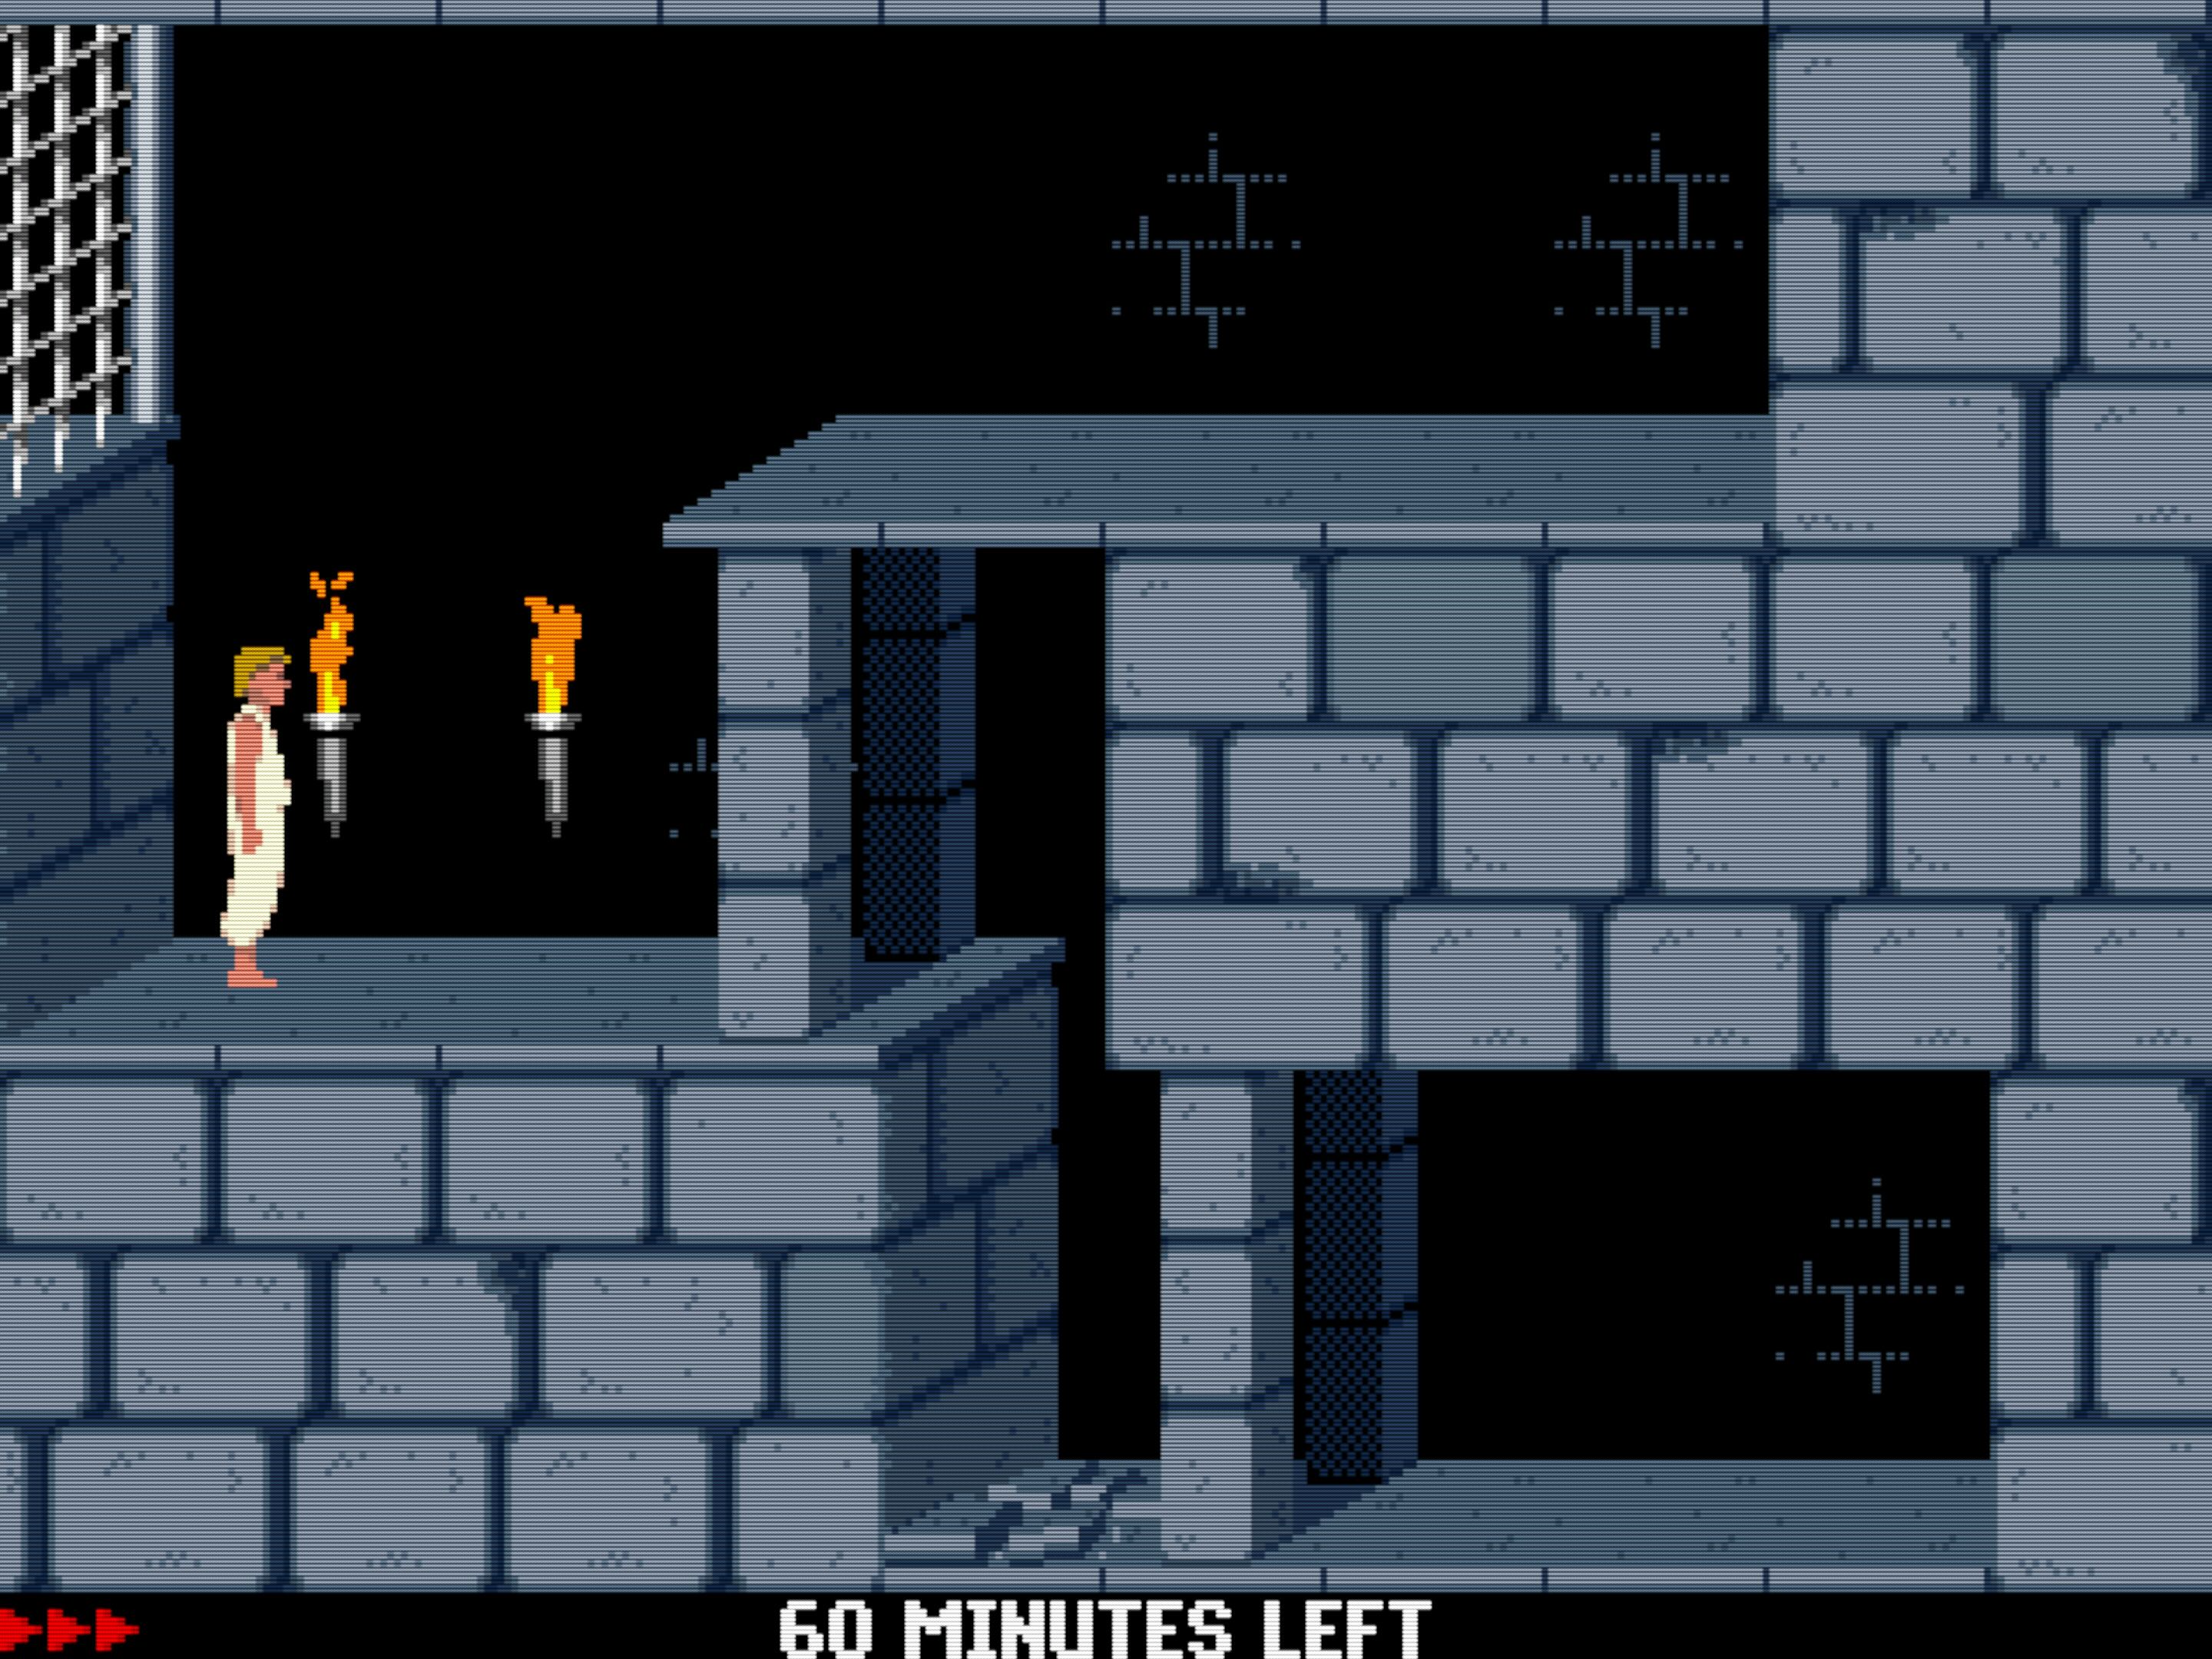
This is where the adventure starts!
Congratulations, you’ve got your very first DOS game running in DOSBox Staging! Have some fun, try to find the sword, overcome a few guards, and maybe even attempt to complete the first level.
You can quit the game by pressing Ctrl+Q, which will return you to the DOS
prompt. There you can use the exit command to close DOSBox. Of course, you
can quit DOSBox any time by pressing Alt+F4 on Windows and Linux, or
Cmd+Q on macOS.
Note
The Ctrl+Q shortcut for quitting the game is specific to Prince of Persia. Other games might provide completely different mechanisms for exiting to DOS, or perhaps none at all.
How to approach old games
If you’ve only ever played modern games, you’re probably in for a bit of a culture shock! There’s minimal to no handholding in most DOS games from the 1980s and the ’90s; you are expected to read the user manual, often there is no in-game tutorial, and the games are generally unforgiving and require a level of dedication from the player that’s uncommon in more modern titles.
However, this does not mean that these games are less fun; on the contrary! The old adage “you get out what you put in” is certainly true for old DOS games. Many people (including the author of this present article) think that the satisfaction and enjoyment you get when mastering such difficult games have few parallels in the modern gaming landscape.
Authentic CRT monitor emulation
DOSBox Staging includes a cathode-ray tube (CRT) monitor emulation feature, which is enabled by default. It strives to achieve authentic, period-correct results; the look of PC CRT monitors from the 1980s and 1990s has been painstakingly recreated via shaders as accurately as current technology allows. These monitors exhibit certain characteristic peculiarities when displaying low-resolution graphics; you can think of them as “built-in filters” that can never be disabled. Artists of the era had to embrace and work with these peculiarities, and people playing DOS games on their CRTs saw the art through the same “filters” as the artists.
For this reason, many people who grew up with CRTs think that once these filters are “digitally removed” by drawing the pixels as sharp little rectangles on modern flat screens, the art looks bland, sterile, and loses its “analog magic”. That’s the main reason behind enabling the CRT emulation by default; to give people a chance to see the art of DOS games in their full glory as the developers intended.
The remarkable thing about the feature is that it’s “zero config” — it
automatically adapts to the changing circumstances to always produce the
correct CRT look based on the emulated graphics adapter, the current DOS video
mode, the window size, and the native resolution of your monitor. You don’t
need to think about it or tinker with it, It Just Works™ 
We’ll showcase the authentic CRT emulation throughout the guide, but if you prefer sharp pixels, we’ll explain how to achieve that in the next chapter.
Proper viewing of screenshots
Screenshots of CRT shaders in action need to be viewed at 100% magnification; otherwise, you might see strange wavy interference patterns caused by the browser rescaling the images. These unwanted artifacts can sometimes resemble repeating rainbow-like patterns, and rest assured, that’s not how CRT emulation is supposed to look in DOSBox Staging!
To view a screenshot featuring a CRT shader properly, click on the image to enlarge it; then, if your mouse cursor looks like a magnifying glass, click on the image again to display it at 100% magnification.
Auto-executing commands at startup
Every time we want to play the game, we need to type in DOS commands to switch
to the C drive and run PRINCE.EXE from there. Isn’t there a way to
automate that?
There certainly is! We need to create a so-called configuration file that can contain various settings to customise the behaviour of DOSBox, along with a list of commands to auto-execute at startup.
Launch your text editor of choice and
create a new plain text file called dosbox.conf inside the Prince of
Persia folder with the following content:
The commands you want to execute right after startup should be listed in the
aptly titled [autoexec] configuration section, with each command in a
separate line. Configuration sections are introduced by names enclosed in
square brackets; everything that follows belongs to that section.
Warning
Some text editors insist on appending the .txt extension after the
filename you enter in their save dialog. This might result in creating a
file called dosbox.conf.txt which won’t work. Get to know your text
editor and make sure you save the configuration file with the .conf
extension only as dosbox.conf
When DOSBox starts, it looks for this special dosbox.conf file in the folder
from which it was started, and if it finds it, it configures the DOS
environment and DOSBox itself according to its contents. This is handy because
we can put a different configuration file into each of our game folders to set
them up differently (this is necessary; it’s simply impossible to create a
single configuration that would work with all DOS games).
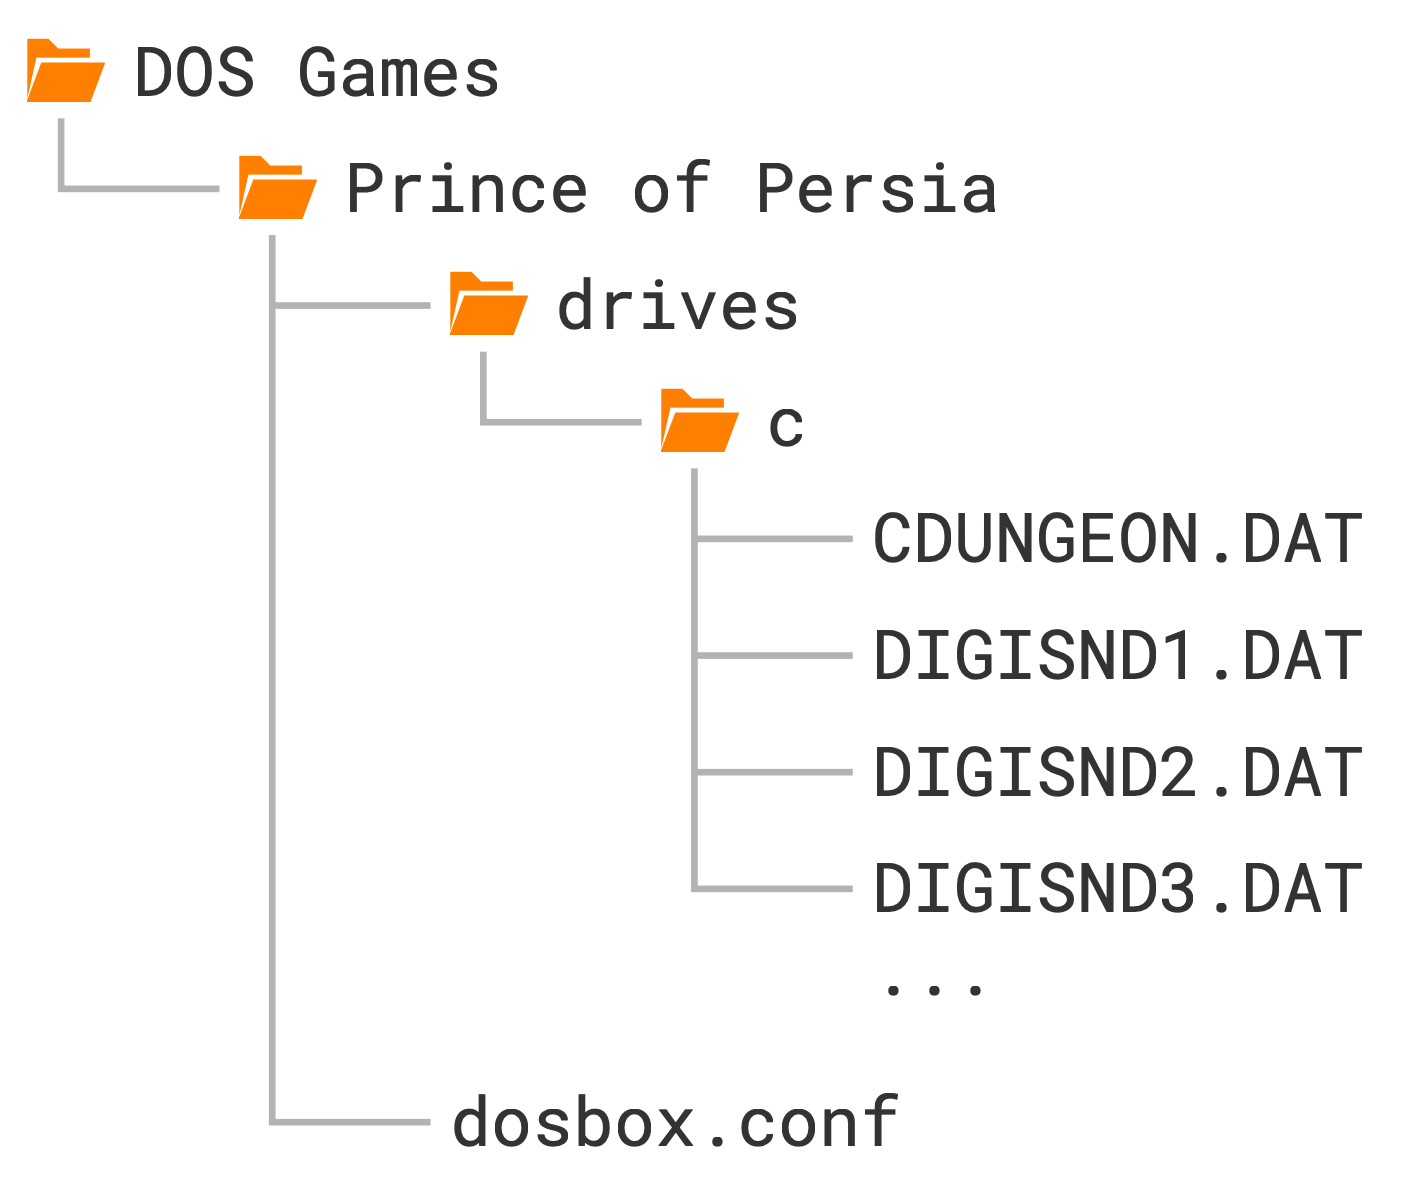
Just to make everything absolutely clear, this is the folder structure we
should have at this point (only the first four files are shown in drives/c
to save space):
Starting up DOSBox Staging from the Prince of Persia folder should now launch the
game right away without any manual intervention!
So far, so good — now, let’s see how we can use the advanced features offered by DOSBox Staging to our advantage!
DOSBox vs DOSBox Staging
Astute readers might have noticed that the guide sometimes refers to “DOSBox Staging” and sometimes to just “DOSBox”. Why is that?
As explained on our About page, DOSBox Staging is a modern continuation of the original DOSBox project. Technically, DOSBox Staging is an open-source fork of and separate project from the SourceForge-hosted DOSBox project.
Generally, we use “DOSBox Staging” when we discuss features specific to Staging, or when we talk about the DOSBox Staging application, installer, or process itself. But when mentioning base functionality present in the original DOSBox and pretty much all other DOSBox variants, we simply say “DOSBox”. Admittedly, sometimes the distinction gets rather blurry, and seeing “DOSBox Staging” fully typed out everywhere would get old rather quickly!
Using the term “DOSBox” is also a nod to the original DOSBox developers, to whom we are grateful for starting this awesome open-source project in the first place.