Starting the emulator
Before continuing, it’s helpful to understand that DOSBox Staging can be used in many different ways. Simply launching the emulator by itself won’t usually be enough to run a game — you’ll be presented with the DOS prompt where you can execute DOS commands, but before you can run most software you’ll need to mount your game files and may also need to configure the emulator for the game you’re playing.
For most users, the recommended approach is to organise each game in its own folder and launch DOSBox Staging from that folder. If you’re new to DOSBox Staging, we recommend reading the Getting Started guide first. It introduces the recommended per-game workflow through practical examples.
The next section explains the concept of the working directory, which underpins the recommended workflow. The remainder of this page then describes the platform-specific ways to launch DOSBox Staging with the correct working directory.
The working directory
The working directory is the folder from which DOSBox Staging is launched. For the recommended per-game workflow, this is simply the game’s folder.
When DOSBox Staging starts, it uses the working directory to discover game-specific resources. Depending on your setup, it can:
- automatically mount the game’s files as DOS drives;
- load a local
dosbox.confwith game-specific settings; - resolve relative paths used by the configuration and other files.
The launch methods described below are simply different ways of starting DOSBox Staging with the correct working directory. See the Storage and Configuration sections for further details.
Terminology
DOS refers to folders as directories, while modern operating systems generally use the term folder. They refer to the same thing, and throughout this manual we use the two terms interchangeably.
Windows
Start from Windows explorer
Windows 11 note
The Windows Explorer context menu integration only works in Windows 8 and 10 currently.
If you have used the installer with the default options to set up DOSBox Staging, simply right-click on a folder in Windows Explorer and select Open with DOSBox Staging in the context menu to launch DOSBox Staging with that folder as the working directory.
Alternatively, navigate to the folder in Windows Explorer, right-click any empty area inside the folder, and then select Open with DOSBox Staging in the context menu.
Start using launch icons
-
Create a batch file called
Start DOSBox Staging.batwith the following content:That’s the default installation path chosen by the installer.
%USERNAME%is your Windows user name. If you have installed DOSBox Staging to a different folder (perhaps by using the portable ZIP package), you should adjust the path accordingly. -
Copy this batch file into your individual game folders and rename them to the names of the games (e.g.,
Prince of Persia.bat). -
Right-click on the batch file icon and select Send to → Desktop (create shortcut) in the context menu.
-
Now you can double-click on the new Prince of Persia.bat - Shortcut icon on your desktop to start the game (of course, you can rename the icon to Prince of Persia or whatever you like; this won’t change the name of the batch file it references).
Alternatively, you can create the shortcut manually, enter the path to the
DOSBox Staging executable, then either set the startup folder to the
game’s folder, or pass it to the emulator with the
--working-dir option.
Start from the command line
-
Create a batch file called
dosbox.bator justdb.batthat launches DOSBox Staging:That’s the default installation path chosen by the installer.
%USERNAME%is your Windows user name. If you have installed DOSBox Staging to a different folder (perhaps by using the portable ZIP package), you should adjust the path accordingly. -
Put this batch file in a folder that’s in your path. Alternatively, you can add the folder where the DOSBox Staging executable lives to your path directly (but make sure there are no other DOSBox variants in your path already).
-
If you use a file manager such as Total Commander, you can simply navigate to your game folder and type
dosbox(ordb) then press Enter to start the game. You can also use the command prompt to navigate to the game’s folder manually then start the batch file, but that’s less convenient.
Windows Defender
Windows Defender (the built-in Windows antivirus starting from Windows 8) might prevent you from running DOSBox Staging when you start it for the first time. This is a false positive; DOSBox Staging has no malicious code whatsoever, it’s simply that antivirus software often mistakenly flags emulators as “malware” because they can run other programs.
If this happens, please follow the steps below to grant Windows permission to run DOSBox Staging. You may need to repeat these steps after upgrading to a newer version.
Explanation
Starting from Windows 8, Microsoft Defender SmartScreen’s pop-up encumbers the execution of newly-developed applications. To prevent this, developers are expected to pay Microsoft’s EV certification vendors a yearly fee (300 to 500 USD) and put the software on Windows Store.
As DOSBox Staging is a volunteer effort, we are not in a position to make such payments. We therefore ask users to manually unblock DOSBox Staging and be patient while Microsoft’s Application Reputation Scheme eventually whitelists DOSBox Staging.
Method 1
Start the application, then click on More info in the dialog that opens. Click the Run anyway button in the second dialog.
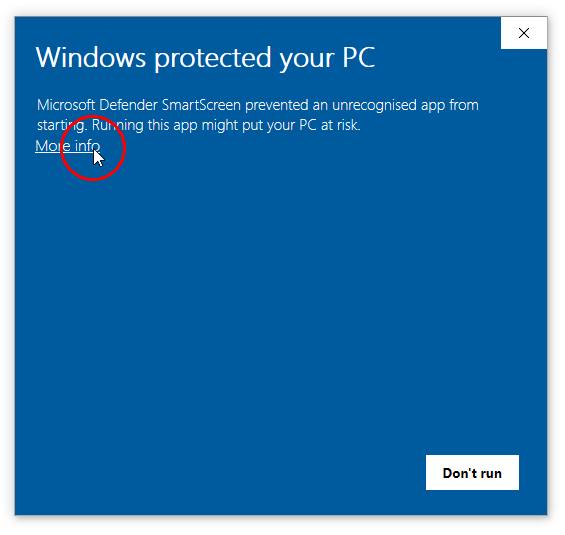
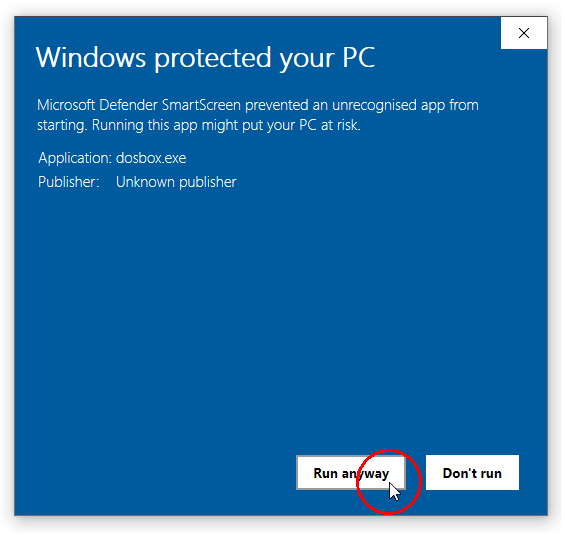
Consider also performing Method 3 to make DOSBox Staging start up faster.
Method 2
In your installation folder, right-click on dosbox.exe, select Properties, tick
Unblock in the dialog that opens, then press OK.
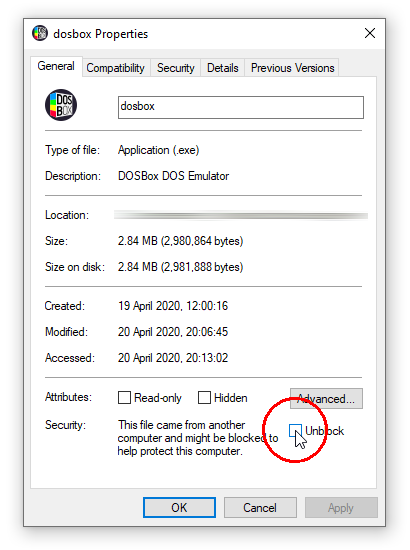
Consider also performing Method 3 to make DOSBox Staging start up faster.
Method 3
Add an exclusion to Windows Security to whitelist the DOSBox Staging executable or the folder in which it resides. We recommend doing so even if you’ve already performed either of the previous methods, as it can eliminate the 3–5 second startup delay caused by the real-time antivirus scan.
See the steps on how to do this here and here.
macOS
Using document packages
The easiest way to launch DOSBox Staging on macOS is to use document packages. Simply add the .dosbox extension to a game folder’s name in Finder (e.g., Prince of Persia becomes Prince of Persia.dosbox), then double-click it to launch DOSBox Staging.
Start using launch icons
-
Mount the DOSBox Staging installer
.dmgimage file. -
Copy the Start DOSBox Staging icon from the window that appears into your game folder (e.g.,
Prince of Persia). -
Right-click or Ctrl-click the icon, then select the topmost Open menu item.
-
A dialog with the following text will appear: macOS cannot verify the developer of “Start DOSBox Staging”. Are you sure you want to open it?
-
Click the Open button.
-
A dialog will open, asking for permission to allow DOSBox Staging access to your Documents folder. Click the OK button.
You only need to perform this procedure the first time you open the Start DOSBox Staging. After the first launch, you can use it like any other regular icon.
It’s recommended to rename the Start DOSBox Staging icons in the individual game folders to the names of the games; then, you can use Spotlight Search to start a game.
For example, rename Start DOSBox Staging in the Prince of Persia folder to
Prince of Persia. Start Spotlight Search by pressing Cmd+Space, then
type in “Prince”. The Prince of Persia icon will show up in the search
results — you can simply press Enter on it to launch the game.
Tip
You don’t need to repeat this procedure for every new game. Once you’ve
opened an icon once, just copy that same icon into any future game folder
— no need to fetch a fresh one from the .dmg each time.
Apple Gatekeeper
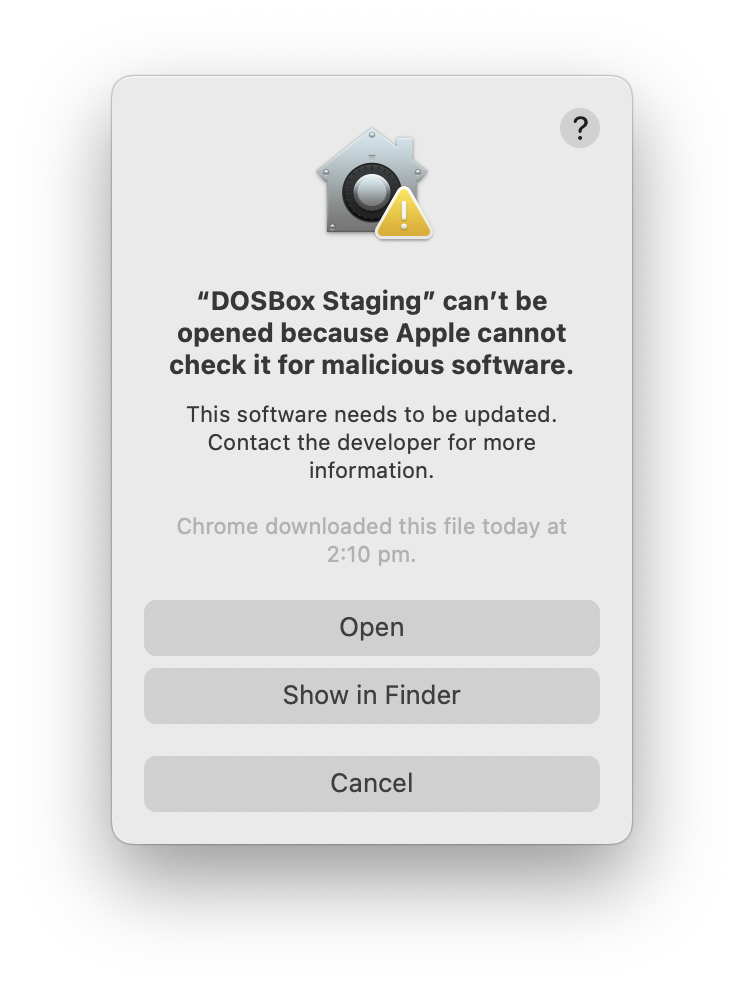
For releases before 0.81.0 and the development snapshot builds, you’ll need to do the following when launching DOSBox Staging for the first time. Later releases are all notarized — they’ll just work.
You’ll need to repeat these steps after upgrading to a more recent development build.
Explanation
Apple’s Gatekeeper feature only permits the running of notarized software, one aspect of which involves developers making yearly payments to Apple.
As DOSBox Staging is a volunteer effort, we were not in a position to make such payments prior to version 0.81.0, and therefore asked users to bypass Apple’s Gatekeeper manually.
Read the first section of this Apple Support article for further info.
macOS Sequoia 15
- Open the DOSBox Staging app, then click Done in the dialog that opens.
- Follow these instructions to allow launching DOSBox Staging in the Privacy & Security tab in System Settings.
macOS Sonoma 14 or earlier
- Ctrl click (or right-click) on the DOSBox Staging app, then click Open.
- Click OK to close the dialog that opens.
- Open the app a second time — now Gatekeeper will show an Open button. Press this to launch DOSBox Staging.
Linux
Start from the command line
Open your favourite terminal and cd into your game folder, then run the
dosbox command from there.
Use the --version argument to check that you’re running DOSBox Staging and
not some other DOSBox variant:
% dosbox --version
dosbox-staging, version 0.83.0

Copyright (C) 2020-2026  The DOSBox Staging Team
License: GNU GPL-2.0-or-later <https://www.gnu.org/licenses/gpl-2.0.html>
Alternatively, create a shell script or a shortcut on your desktop that executes the following command:
dosbox --working-dir <PATH>
<PATH> is the absolute path of your game folder.
Start using launch icons
The easiest way is to create a shell script with the following content (modify
the path passed in with the
--working-dir option so it points to
your game folder):
Then, create an icon on your desktop that launches this script, or start it using your desktop environment’s preferred launcher.