Rendering
DOSBox Staging uses adaptive CRT shaders by default that emulate the look of period-appropriate monitors. A VGA game gets a VGA-style CRT look, an EGA game gets an EGA-era monitor, and so on. The results are surprisingly close to what these games looked like on the real hardware they were designed for.
If you prefer a crisp, pixel-perfect look without any CRT emulation, set
shader = sharp. For completely unprocessed output, use shader = none.
Most DOS games used non-square pixels, e.g., the most commonly used 320×200 resolution was stretched to fill 4:3 aspect ratio CRT monitors, resulting in slightly tall pixels. Aspect ratio correction is enabled by default so to ensure these games look as intended. With aspect ratio correction disabled, 320×200 games would appear slightly squished; this is especially noticeable in games that feature common everyday objects and human characters (for example, you’ll get the notorious “stumpy Guybrush” in Monkey Island).
The image adjustment controls — brightness, contrast, saturation, colour temperature, etc. — work much like the knobs on an old CRT monitor. They’re useful for fine-tuning the picture to your taste or compensating for differences in display characteristics. CRT colour profiles go a step further, emulating the distinct phosphor colours of different monitor types, and on wide gamut displays these profiles can reproduce CRT colours that fall outside the standard sRGB colour space more accurately. For Hercules and CGA mono machines, we offer authentic monochrome display emulation options mimicking classic amber, green, white, and paperwhite looks.
Beyond CRT emulation, DOSBox Staging can also blend away dither patterns in old EGA and CGA games, and deinterlace FMV video to remove the distracting black lines found in many 90s games.
Adaptive CRT shaders
DOSBox Staging includes adaptive CRT shaders that automatically select the appropriate monitor emulation based on the current video mode:
-
crt-autodefault — Prioritises developer intent and how people experienced games at the time. VGA games appear double-scanned (as on a real VGA monitor), EGA games appear single-scanned with thicker scanlines, and so on, regardless of themachinesetting. -
crt-auto-machine— Emulates a fixed CRT monitor for the video adapter configured via themachinesetting. CGA and EGA modes on a VGA machine always appear double-scanned with chunky pixels, as on a real VGA adapter. -
crt-auto-arcade— A fantasy option that emulates a 15 kHz arcade or home computer monitor with thick scanlines in low-resolution modes. Fun for playing DOS VGA ports of Amiga and Atari ST games. -
crt-auto-arcade-sharp— A sharper arcade variant that retains the thick scanlines but with the sharpness of a typical PC monitor.
The CRT shaders generally need at least 3 times the vertical resolution of the
emulated video mode to function. If the vertical resolution is less than that,
DOSBox Staging will revert to sharp pixels (the sharp shader). For example,
for the 640×480 VGA mode, the viewport height must be 480 × 3 =
1440 pixels or greater.
VGA double scanning
The 320×200 mode is double-scanned to 640×400 on VGA — that’s just how the VGA hardware works, and emulating this is required for authentic-looking results (two scanlines per pixel is the iconic low-resolution VGA look). On all other graphics adapters, 320×200 is single-scanned, so it remains 320×200.
On 1080p, the auto CRT shaders employ some “fake double scanning” trickery to maximise the image for emulated VGA modes.
Integer scaling
The integer_scaling setting constrains the horizontal or
vertical scaling factor to integer values when upscaling the image. This
avoids uneven scanlines and interference artifacts with CRT shaders.
The default auto mode enables vertical integer scaling only for the adaptive
CRT shaders, with refinements: 3.5x and 4.5x scaling factors are also
allowed, and integer scaling is disabled above 5.0x.
The correct aspect ratio is always maintained, so the other dimension’s
scaling factor may become fractional. With the sharp shader, this is not a
problem as the interpolation band is at most 1 pixel wide at the edges, which
is sharp, especially at 1440p or 4K. With CRT shaders, non-integer horizontal
scaling is practically a non-issue.
Aspect ratio & viewport
Most DOS games used non-square pixels and were designed for 4:3 CRT displays. The standard 320×200 VGA mode fills a 4:3 screen completely, which is only possible if each pixel is a slightly tall rectangle — exactly 20% taller than wide, giving a pixel aspect ratio (PAR) of 1:1.2 (or 5:6). You can derive this from the display: 4:3 scales to 320:240, and 240 / 200 = 1.2.
Aspect ratio correction is enabled by default (aspect = auto) so games look
as intended. Without it, 320×200 content appears squished on modern
square-pixel displays.
A small number of DOS games need square pixels (aspect = square-pixels).
These are typically European games ported from the PAL Amiga, where the
original art was designed for square pixels at 320×256. Studios known
for this include Revolution Software
(Beneath a Steel Sky,
Lure of the Temptress),
Delphine Software (Another World,
Flashback),
and Coktel Vision (Gobliiins
series). The tell-tale sign is scanned or hand-drawn artwork that appears
vertically stretched with aspect ratio correction enabled.
Pixels are square (1:1 PAR) in 640×480 and higher resolutions. A few other modes have their own non-square PARs: 640×350 EGA (1:1.37 PAR), 640×200 EGA (1:2.4 PAR), and 720×348 Hercules (1:1.55 PAR). DOSBox Staging handles all of these automatically. For a more detailed explanation of pixel aspect ratios, see Aspect ratios & black borders.
Custom aspect ratios
DOSBox Staging also has a “stretch everything” mode for when aspect ratio authenticity isn’t the priority.
The stretch aspect mode calculates the aspect ratio from the viewport
dimensions, allowing you to force arbitrary aspect ratios. For example, to
stretch a game to fill the entire screen:
It’s hard to argue it matters much for text adventures or abstract games — though for anything with carefully drawn art, opinions vary.
The relative viewport mode starts from a 4:3 rectangle and scales it by
horizontal and vertical stretch factors. With this, you can emulate the
horizontal and vertical stretch controls of a CRT. This is useful for
aspect-correcting lazy Hercules conversions that reused EGA/VGA assets.
For example, to correct the squashed look of Hercules graphics in Prince of Persia:
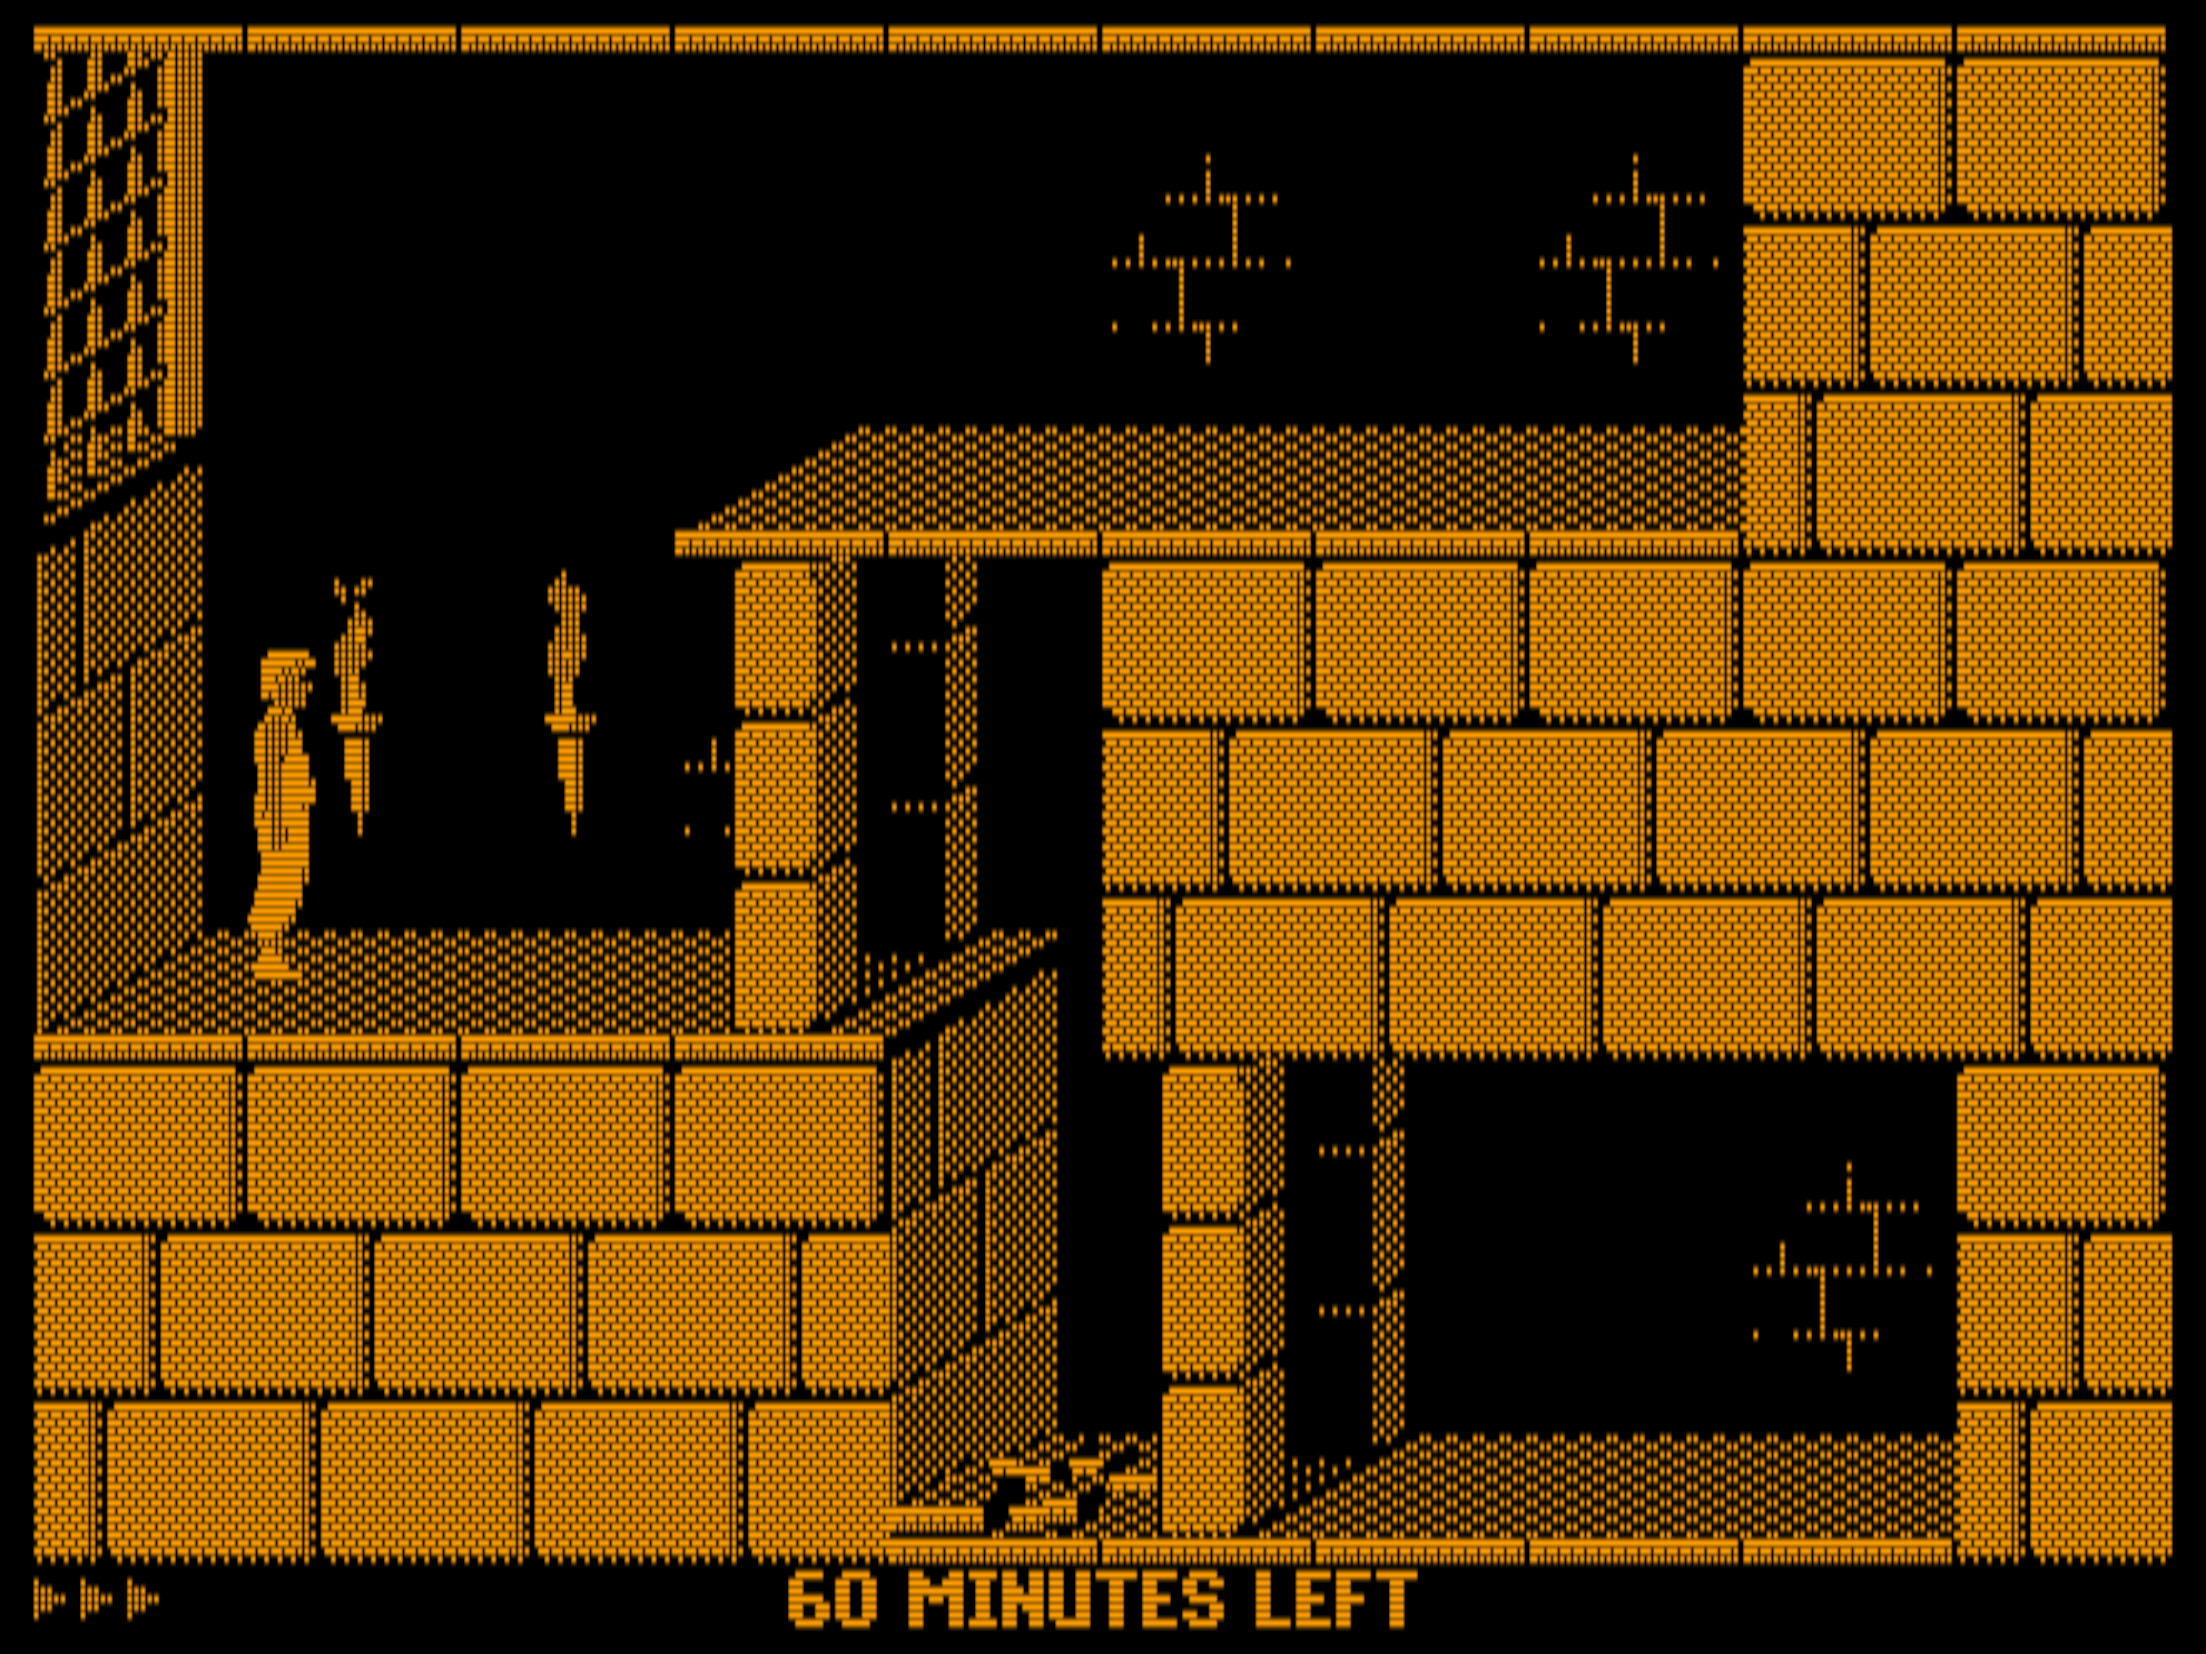
Prince of Persia in Hercules mode with custom stretch factors
to make the image fill our 4:3 “emulated CRT screen”.
Use the Stretch Axis, Inc Stretch, and Dec Stretch hotkey actions to adjust stretching in real-time (you’ll need to map them in the key mapper first), then copy the logged viewport setting to your config.
CRT colour profiles
Different CRT monitors used different phosphor chemistries, giving each a
distinct colour character. DOSBox Staging can emulate these via the
crt_color_profile setting.
-
p22— P22 phosphors were the most common in PC monitors, producing warmer, slightly desaturated colours. This is what most people saw when playing DOS games. -
smpte-c— SMPT-C broadcast standard phosphors are close to P22 but with tighter colour tolerances, used in professional video monitors. -
ebu— EBU phosphors are the European broadcast standard, found in high-end professional monitors like the Sony BVM/PVM series. -
philips— Philips home computer monitors (e.g., the Commodore 1084S) had distinctly warm, yellowish whites at roughly 6100K. -
trinitron— Sony Trinitrion monitors were known for punchy, vivid colours with a cool blue-white colour temperature around 9300K.
The auto setting picks the profile that matches the era: CGA and EGA games
get P22 (matching the monitors of that era), VGA games also get P22, composite
video gets SMPTE-C, and the arcade shaders use Philips. See the Automatic
image adjustments table for the full mapping.
Monochrome display emulation
For hercules and cga_mono machine types, the
monochrome_palette setting offers four classic
terminal looks:
-
amber— the warm orange-yellow glow of monochrome terminals like the IBM 5151 with an amber phosphor. This was the most common monochrome display in offices and the most comfortable for extended reading. -
green— the classic green phosphor look of the original IBM 5151 green screen, a staple of the early PC era. -
white— a cool blue-white typical of later monochrome VGA monitors. -
paperwhite— the Hercules-era paperwhite phosphor, a warmer, slightly yellowish white that’s easier on the eyes than pure white.
You can cycle through the available palettes via hotkeys during gameplay.
Automatic image adjustments
When crt_color_profile,
color_temperature, or black_level
are set to auto, DOSBox picks period-appropriate values for each video mode.
The result is that CGA and EGA games look like they did on the slightly warm,
high-colour-temperature monitors of the 1980s, while VGA games get the cooler,
more neutral look of 90s PC monitors.
The selection logic depends on the shader mode:
-
crt-autoselects settings based on the graphics standard of the current video mode (CGA, EGA, VGA, etc.), irrespective of themachinesetting. EGA modes that reprogram the VGA’s 18-bit DAC palette get VGA settings to reflect that they require VGA hardware. -
crt-auto-machineselects settings based on the emulated machine type configured via themachinesetting. -
crt-auto-arcadeandcrt-auto-arcade-sharpalways use fixed arcade monitor settings. -
Regular shaders (e.g.,
sharp,bilinear) select settings based on the emulated machine type.
In all modes, composite video always uses composite-specific settings regardless of the machine type.
The following table shows the automatically selected values:
| Video mode | CRT profile | Colour temp (K) | Black level |
|---|---|---|---|
| Monochrome | None | 6500 | 0 |
| Composite | SMPTE-C | 6500 | 0.53 |
| CGA / PCjr | P22 | 9300 | 0.65 |
| EGA / Tandy | P22 | 9300 | 0.60 |
| VGA / SVGA | P22 | 7800 | 0 |
| Arcade | Philips | 6500 | 0.50 |
Note
The black level values shown are for DCI-P3 colour spaces with gamma 2.6 or higher. For lower-gamma colour spaces (sRGB, Display P3), the black level is halved.
Wide gamut & colour accuracy
CRT monitors used phosphor coatings with colour gamuts that often fall outside the sRGB colour space used by most modern displays. P22, Trinitron, and Philips phosphors all have saturated primaries that sRGB simply cannot reproduce. A wide gamut display (DCI-P3 or wider) lets DOSBox Staging render these colours faithfully, getting closer to what games looked like on real hardware.
The practical benefit depends on your operating system:
-
macOS always outputs in the Display P3 colour space. The OS handles the conversion to your monitor’s actual colour profile automatically. This gives you the most accurate results out of the box.
-
Windows and Linux currently output sRGB. A DCI-P3 monitor still helps because the Philips and Trinitron profiles push colours toward the gamut boundary, but full accuracy requires macOS or a future colour-managed rendering path on these platforms.
If you have a wide gamut display, the auto defaults for
crt_color_profile and
color_space give you accurate colours out of the box. The
Philips and Trinitron profiles show the biggest difference on DCI-P3 versus
sRGB displays.
Deinterlacing
Many 90s DOS games displayed full-motion video (FMV) using interlaced rendering, showing only every second line of the video frame. This halved storage requirements and looked fine on small CRTs where the brain filled in the gaps, but on modern flat screens the alternating black lines look distracting and halve the apparent brightness.
The deinterlacing setting automatically detects interlaced
regions within each frame and reconstructs the missing lines. The detection is
intelligent; it only touches interlaced areas while leaving HUDs, UI frames,
subtitles, and mouse cursors untouched.
Both common interlacing patterns are supported: standard line interlacing (alternating black horizontal lines, used by most games) and dot interlacing (a checkerboard pattern, used by the CD-ROM versions of Dune and KGB).
Enable deinterlacing per-game rather than globally for best results.
Games that benefit from deinterlacing
Note
Enabling vertical integer_scaling is recommended on
lower resolution displays to avoid interference artifacts when using lower
deinterlacing strengths. Alternatively, use full strength to completely
eliminate all potential interference patterns.
Dedithering
Many DOS games used dithering — alternating pixel patterns — to simulate more colours than their limited palette could display. This was especially common in 16-colour EGA games, where checkerboard patterns created the illusion of intermediate shades.
The dedithering setting detects these checkerboard patterns
and blends them into solid colours. It works with any graphics adapter (CGA,
EGA, VGA, Hercules) and any resolution, and can be combined with any shader.
Games that benefit from dedithering
Note
Dedithering is not a more authentic representation. On real PC CRT
monitors, dither patterns were clearly visible — blending them into solid
colours was only a thing on consoles connected to consumer TV sets. For a
more authentic look, use shader = crt-auto instead.
CGA palette override
The 16-colour CGA/EGA RGBI palette can be overridden with alternative colour
interpretations via the cga_colors setting. This affects CGA/EGA-like modes
even on emulated VGA or Tandy graphics adapters.
Several built-in presets are available, including Amiga and Atari ST colours for Sierra AGI games, various CGA/EGA monitor emulations, and Commodore 64 inspired colours. Custom palettes can also be specified.
The tandy-warm preset emulates colours as they appear on an actual Tandy
monitor, resulting in more subdued and pleasant colours — especially
apparent on the greens.
Shader presets
Shaders can be configured with presets that override their default settings
and parameters. Presets are specified using the SHADER_NAME:PRESET_NAME
format in the shader setting. If no preset is specified, the shader’s
built-in defaults are used.
For example:
The adaptive CRT shaders (crt-auto, crt-auto-machine, crt-auto-arcade,
crt-auto-arcade-sharp) automatically select the appropriate preset based on
the graphics standard and viewport resolution. For example, crt-auto might
resolve to crt/crt-hyllian:cga-1080p for a CGA game at 1080p, or
crt/crt-hyllian:vga-4k for a VGA game at 4K resolution. The sharp shader
is used as a fallback below 3x vertical scaling.
Preset files are INI-format files that can override shader settings and parameters:
[settings]
force_single_scan = yes
force_no_pixel_doubling = yes

[parameters]
BEAM_MIN_WIDTH     = 0.70
SCANLINES_STRENGTH = 0.65
The [settings] section can include:
force_single_scan— Force single scanning for double-scanned modes.force_no_pixel_doubling— Disable pixel doubling.linear_filtering— Enable or disable bilinear texture filtering.
The [parameters] section overrides shader-specific parameters declared in
the shader source.
Image adjustments
The image adjustment system emulates the controls of a CRT monitor. The
image_adjustments setting enables or disables all
adjustments. When disabled, the raw RGB values from the emulated video adapter
are displayed without any processing (except colour space conversion).
The available adjustments are:
-
brightnessandcontrastemulate the corresponding CRT monitor knobs — brightness sets the black point, contrast sets the white point. -
gammaapplies additional gamma correction relative to the emulated monitor’s gamma. -
digital_contrastandsaturationare applied directly to the raw framebuffer RGB values, unlike the CRT-emulating brightness/contrast controls. -
color_temperatureadjusts the white point in Kelvin;color_temperature_luma_preservecontrols how much luminosity is preserved during the adjustment. -
red_gain,green_gain, andblue_gainadjust individual colour channel gain.
The image adjustment settings can be tweaked in real-time using
hotkeys — use
“Previous/Next Image Adjustment” to select a setting and
“Increase/Decrease” to adjust its value. The adjusted values are logged so you
can copy them into your config file. Alternatively, use the CONFIG -wc DOS
command to write the current settings to a config file.
Configuration settings
You can set the rendering parameters in the [render] configuration section.
Aspect ratio & scaling
aspect
-
Set the aspect ratio correction mode.
Possible values:
-
autodefault,on– Apply aspect ratio correction for modern square-pixel flat-screen displays, so DOS video modes with non-square pixels appear as they would on a 4:3 display aspect ratio CRT monitor the majority of DOS games were designed for. This setting only affects video modes that use non-square pixels, such as 320x200 or 640x400; square pixel modes (e.g., 320x240, 640x480, and 800x600) are displayed as-is. -
square-pixels,off– Don’t apply aspect ratio correction; all DOS video modes will be displayed with square pixels. Most 320x200 games will appear squashed, but a minority of titles (e.g., DOS ports of PAL Amiga games) need square pixels to appear as the artists intended. -
stretch– Calculate the aspect ratio from the viewport’s dimensions. Combined with theviewportsetting, this mode is useful to force arbitrary aspect ratios (e.g., stretching DOS games to fullscreen on 16:9 displays) and to emulate the horizontal and vertical stretch controls of CRT monitors.
-
integer_scaling
-
Constrain the horizontal or vertical scaling factor to the largest integer value so the image still fits into the viewport. The configured aspect ratio is always maintained according to the
aspectandviewportsettings, which may result in a non-integer scaling factor in the other dimension. If the image is larger than the viewport, the integer scaling constraint is auto-disabled (same asoff).Possible values:
-
autodefault – A special vertical mode auto-enabled only for the CRT shaders (seeshader). This mode has refinements over standard vertical integer scaling: 3.5x and 4.5x scaling factors are also allowed, and integer scaling is disabled above 5.0x scaling. -
vertical`` -- Constrain the vertical scaling factor to integer values. This is the recommended setting for 3rd party CRT shaders with scanline emulation to avoid uneven scanlines and interference artifacts. For the built-in CRT shaders, useauto. This mode is also recommended on low-resolution displays with [deinterlacing`](#deinterlacing) enabled. -
horizontal– Constrain the horizontal scaling factor to integer values. Might be useful on low-resolution displays to optimise for horizontal text sharpness. -
off– Apply no integer scaling constraint; the image fills the viewport while maintaining the configured aspect ratio.
-
viewport
-
Set the viewport size. This is the maximum drawable area; the video output is always contained within the viewport while taking the configured aspect ratio into account (see
aspect).Possible values:
-
fitdefault – Fit the viewport into the available window/screen. There might be padding (black areas) around the image withinteger_scalingenabled. -
WxH– Set a fixed viewport size in WxH format in logical units (e.g.,960x720). The specified size must not be larger than the desktop. If it’s larger than the window size, it will be scaled to fit within the window. -
N%– Similar toWxH, but the size is specified as a percentage of the desktop size. -
relative H% V%– The viewport is set to a 4:3 aspect ratio rectangle fit into the available window or screen, then is scaled by the H and V horizontal and vertical scaling factors (valid range is from 20% to 300%). The resulting viewport is allowed to extend beyond the bounds of the window or screen. Useful to force arbitrary display aspect ratios withaspectset tostretchand to “zoom” into the image. This effectively emulates the horizontal and vertical stretch controls of CRT monitors.
Note
-
Using
relativemode withinteger_scalingenabled could lead to surprising (but correct) results. -
Use the
Stretch Axis,Inc Stretch, andDec Stretchhotkey actions to adjust the image size inrelativemode in real-time, then copy the new settings from the logs into your config.
-
Shaders
shader
-
Set an adaptive CRT monitor emulation shader or a regular shader. Shaders are only supported in the OpenGL output mode (see
output).Adaptive CRT shader options:
-
crt-autodefault – Adaptive CRT shader that prioritises developer intent and how people experienced the games at the time of release. An appropriate shader variant is auto-selected based on the graphics standard of the current video mode and the viewport size, irrespective of themachinesetting. -
crt-auto-machine– A variation ofcrt-auto; this emulates a fixed CRT monitor for the video adapter configured via themachinesetting. -
crt-auto-arcade– Emulation of an arcade or home computer monitor with a less sharp image and thick scanlines in low-resolution video modes. This is a fantasy option that never existed in real life, but it can be a lot of fun, especially with DOS ports of Amiga games. -
crt-auto-arcade-sharp– A sharper arcade shader variant for those who like the thick scanlines but want to retain the sharpness of a typical PC monitor.
Other shader options include (non-exhaustive list):
-
sharp– Upscale the image treating the pixels as small rectangles, resulting in a sharp image with minimum blur while maintaining the correct pixel aspect ratio. This is the recommended option for those who don’t want to use the adaptive CRT shaders. -
bilinear– Upscale the image using bilinear interpolation (results in a blurry image). -
nearest– Upscale the image using nearest-neighbour interpolation (also known as “no bilinear”). This results in the sharpest possible image at the expense of uneven pixels, especially with non-square pixel aspect ratios (this is less of an issue on high resolution monitors).
The following short aliases are also available:
sharp(forinterpolation/sharp),bilinear(forinterpolation/bilinear),nearest(forinterpolation/nearest).The bundled shaders include:
-
Interpolation:
sharp,bilinear,nearest,catmull-rom -
CRT:
crt-hyllian,vga-1080p,vga-1080p-fake-double-scan(all used by the adaptive CRT shaders with different presets) -
Scaler:
advinterp2x,advinterp3x,advmame2x,advmame3x,xbr-lv2-3d,xbr-lv2-noblend,xbr-lv3
Shaders are located in subdirectories; use the full path (e.g.,
interpolation/catmull-romorscaler/xbr-lv3). The.glslextension can be omitted.Note
Start DOSBox Staging with the
--list-shaderscommand line option to see the full list of available shaders. You can also use an absolute or relative path to a file. In all cases, you may omit the shader’s.glslfile extension. -
Image adjustments
image_adjustments
-
Enable image adjustments. When disabled, the image adjustment settings in the render section (e.g.,
crt_color_profile,brightness,contrast, etc.) have no effect and the raw RGB values are used for the video output. The colour space conversion is always active, that cannot be disabled (seecolor_space).Possible values:
ondefault,offNote
-
Image adjustments only work in OpenGL output mode.
-
Adjustments are applied to rendered screenshots, but not to raw and upscaled screenshots and video captures.
-
Use the
PrevImageAdjandNextImageAdjhotkeys to select an image adjustment setting and theDecImageAdjandIncImageAdjhotkeys to adjust the settings in real-time. Copy the new settings from the logs into your config, or write a new config with theCONFIG -wccommand.
-
crt_color_profile
-
Set a CRT colour profile for more authentic video output emulation. All profiles have a built-in colour temperature (white point) that you can tweak further with the
color_temperaturesetting.Possible values:
-
autodefault – Select an authentic colour profile appropriate for the currently active adaptive CRT shader (e.g.,crt-auto), or the current machine type for regular shaders (e.g.,sharp). -
none– Display raw colours without any colour profile transforms. This will result in inaccurate colours and gamma on modern displays compared to how games looked on a real CRT in the 1980s and 90s. -
ebu– EBU standard phosphor emulation, used in high-end professional CRT monitors, such as the Sony BVM/PVM series. -
p22– P22 phosphor emulation, most common in lower-end CRT monitors. -
smpte-c– SMPTE “C” phosphor emulation, the standard for American broadcast video monitors. -
philips– Philips CRT monitor colours typical to 15 kHz home computer monitors (e.g., the Commodore 1084S). The intended use of this profile is withcolor_temperatureset to 6500. The output will look yellowish due to the ~6100 K Philips CRT colour temperature “baked into” the profile. You can still tweak the relative white balance by changingcolor_temperature. Needs a DCI-P3 display for the most accurate results. -
trinitron– Typical Sony Trinitron CRT TV and monitor colours. The intended use of this profile is withcolor_temperatureset to 6500. The output will look blueish due to the ~9300 K Trinitron CRT colour temperature “baked into” the profile. You can still tweak the relative white balance by changingcolor_temperature. Needs a DCI-P3 display for the most accurate results.
-
brightness
- Set the brightness of the video output (
45by default). Valid range is 0 to 100. This emulates the brightness control of CRT monitors that sets the black point; higher values will result in raised blacks.
contrast
- Set the contrast of the video output (
65by default). Valid range is 0 to 100. This emulates the contrast control of CRT monitors that sets the white point; higher values will result in raised blacks (lower thebrightnesscontrol to compensate).
gamma
- Set the gamma of the video output (
0by default). Valid range is -50 to 50. This is additional gamma adjustment relative to the emulated virtual monitor’s gamma.
digital_contrast
- Set the digital contrast of the video output (
0by default). Valid range is -50 to 50. This works very differently from thecontrastvirtual monitor setting; digital contrast is applied to the raw RGB values of the framebuffer image.
black_level
-
Raise the black level of the video output. It is applied before the
brightnessandcontrastsettings which can also raise the black level, so it effectively acts as a black level boost.Possible values:
-
autodefault – Raise the black level for PCjr, Tandy, CGA and EGA video modes only for adaptive CRT shaders; for any other shader, use 0. -
<number>– Set the black level raise amount. Valid range is 0 to 100. 0 does not raise the black level.
Note
Raising the black level is useful for “black scanline” emulation; this adds visual interest to PCjr, Tandy, CGA, and EGA games with simple graphics.
-
saturation
- Set the saturation of the video output (
0by default). Valid range is -50 to 50. This is digital saturation applied to the raw RGB values of the framebuffer image, similarly todigital_contrast.
color_temperature
-
Set the colour temperature (white point) of the video output.
Possible values:
-
autodefault – Select an authentic colour temperature appropriate for the currently active adaptive CRT shader (e.g.,crt-auto), or the current machine type for regular shaders (e.g.,sharp). -
<number>– Specify colour temperature in Kelvin (K). Valid range is 3000 to 10000. 6500 K is the neutral point for most modern displays. Values below 6500 result in warmer colours, values above 6500 in cooler colours.
-
color_temperature_luma_preserve
- Preserve image luminosity prior to colour temperature adjustment (
0by default). Valid range is 0 to 100. 0 doesn’t perform any luminosity preservation, 100 fully preserves the luminosity. Values greater than 0 result in inaccurate colour temperatures in the brighter shades, so it’s best to set this to 0 or close to 0 if your monitor is bright enough.
red_gain
- Set gain factor of the video output’s red channel (
100by default). Valid range is 0 to 200. 100 results in no gain change.
green_gain
- Set gain factor of the video output’s green channel (
100by default). Valid range is 0 to 200. 100 results in no gain change.
blue_gain
- Set gain factor of the video output’s blue channel (
100by default). Valid range is 0 to 200. 100 results in no gain change.
Other
color_space
-
Set the colour space of the video output. Wide gamut colour spaces can reproduce CRT phosphor colours that fall outside the sRGB gamut — see Wide gamut & colour accuracy for details.
On macOS, this is always
display-p3; the OS performs the conversion to the colour profile set in your system settings. On Windows and Linux, the effective output is currently sRGB.Possible values:
display-p3– Display P3 wide gamut colour space with 6500K white point and sRGB gamma.
Note
Colour space transforms are applied to rendered screenshots, but not to raw and upscaled screenshots and video captures (those are always in sRGB).
monochrome_palette
-
Set the palette for monochrome display emulation. Works only with the
herculesandcga_monomachine types.Possible values:
amberdefault,green,white,paperwhite.Note
You can also cycle through the available palettes via hotkeys.
cga_colors
-
Set the interpretation of CGA RGBI colours. Affects all machine types capable of displaying CGA or better graphics, including the PCjr, the Tandy, and CGA/EGA modes on VGA adapters.
Built-in presets:
-
defaultdefault – The canonical CGA palette, as emulated by VGA adapters. -
tandy <bl>– Emulation of an idealised Tandy monitor with adjustable brown level. The brown level can be provided as an optional second parameter (0–red, 50–brown, 100–dark yellow; defaults to 50). -
tandy-warm– Emulation of the actual colour output of an unknown Tandy monitor. Intended to be used withcrt_color_profile = noneandcolor_temperature = 6500. -
ibm5153 <c>– Emulation of the actual colour output of an IBM 5153 monitor with a unique contrast control that dims non-bright colours only. The contrast can be optionally provided as a second parameter (0 to 100; defaults to 100). Intended to be used withcrt_color_profile = noneandcolor_temperature = 6500. -
agi-amiga-v1,agi-amiga-v2,agi-amiga-v3– Palettes used by the Amiga ports of Sierra AGI games. -
agi-amigaish– A mix of EGA and Amiga colours used by the Sarien AGI-interpreter. -
scumm-amiga– Palette used by the Amiga ports of LucasArts EGA games. -
colodore– Commodore 64 inspired colours based on the Colodore palette. -
colodore-sat– Colodore palette with 20% more saturation. -
dga16– A modern take on the canonical CGA palette with dialled back contrast.
You can also set custom colours by specifying 16 space or comma separated sRGB colour values, either as 3 or 6-digit hex codes (e.g.,
#f00or#ff0000for full red), or decimal RGB triplets (e.g.,(255, 0, 255)for magenta).Note
These colours will be further adjusted by the video output settings (see
crt_color_profile,brightness,saturation, etc.) -
deinterlacing
-
Remove black lines from interlaced videos. Use with games that display video content with alternating black lines. This trick worked well on CRT monitors to increase perceptual resolution while saving storage space, but it resulted in brightness loss.
Possible values:
-
offdefault – Disable deinterlacing. -
on– Enable deinterlacing atmediumstrength. -
light– Light deinterlacing. Black scanlines are softened to mimic the CRT look. -
medium– Medium deinterlacing. Best balance between removing black lines, increasing brightness, and keeping the higher resolution look. -
strong– Strong deinterlacing. Image brightness is almost completely restored at the expense of diminishing the higher resolution look. -
full– Full deinterlacing. Completely removes black lines and maximises brightness, but the image will appear blockier.
Note
Enabling vertical
integer_scalingis recommended on lower resolution displays to avoid interference artifacts when using lower deinterlacing strengths. Alternatively, usefullstrength to completely eliminate all potential interference patterns. -
dedithering
-
Remove checkerboard dither patterns from the video output. Useful with CGA and EGA games that use dither patterns to create the illusion of more colours with the limited CGA/EGA palettes.
Possible values:
-
offdefault – Disable dedithering. -
on– Enable dedithering (at full strength). -
<number>– Set dedithering strength from 0 (off) to 100 (full strength). Lower values result in a subtle softening of dither patterns; higher values blend between the original and the dedithered image.
Note
-
Dedithering only works in OpenGL output mode.
-
Dedithering is applied to rendered screenshots, but not to raw and upscaled screenshots and video captures.
-